VART X APIs Application Developer Guide#
Video analytics use cases are increasingly becoming critical across various industries due to their ability to enhance security, streamline operations, and improve decision-making processes. A typical Video Analytics pipeline, depicted in the following image, involves pre-processing on the input video/image, followed by the inference operation and then post-processing the results to extract the meaningful insight from the video/image.
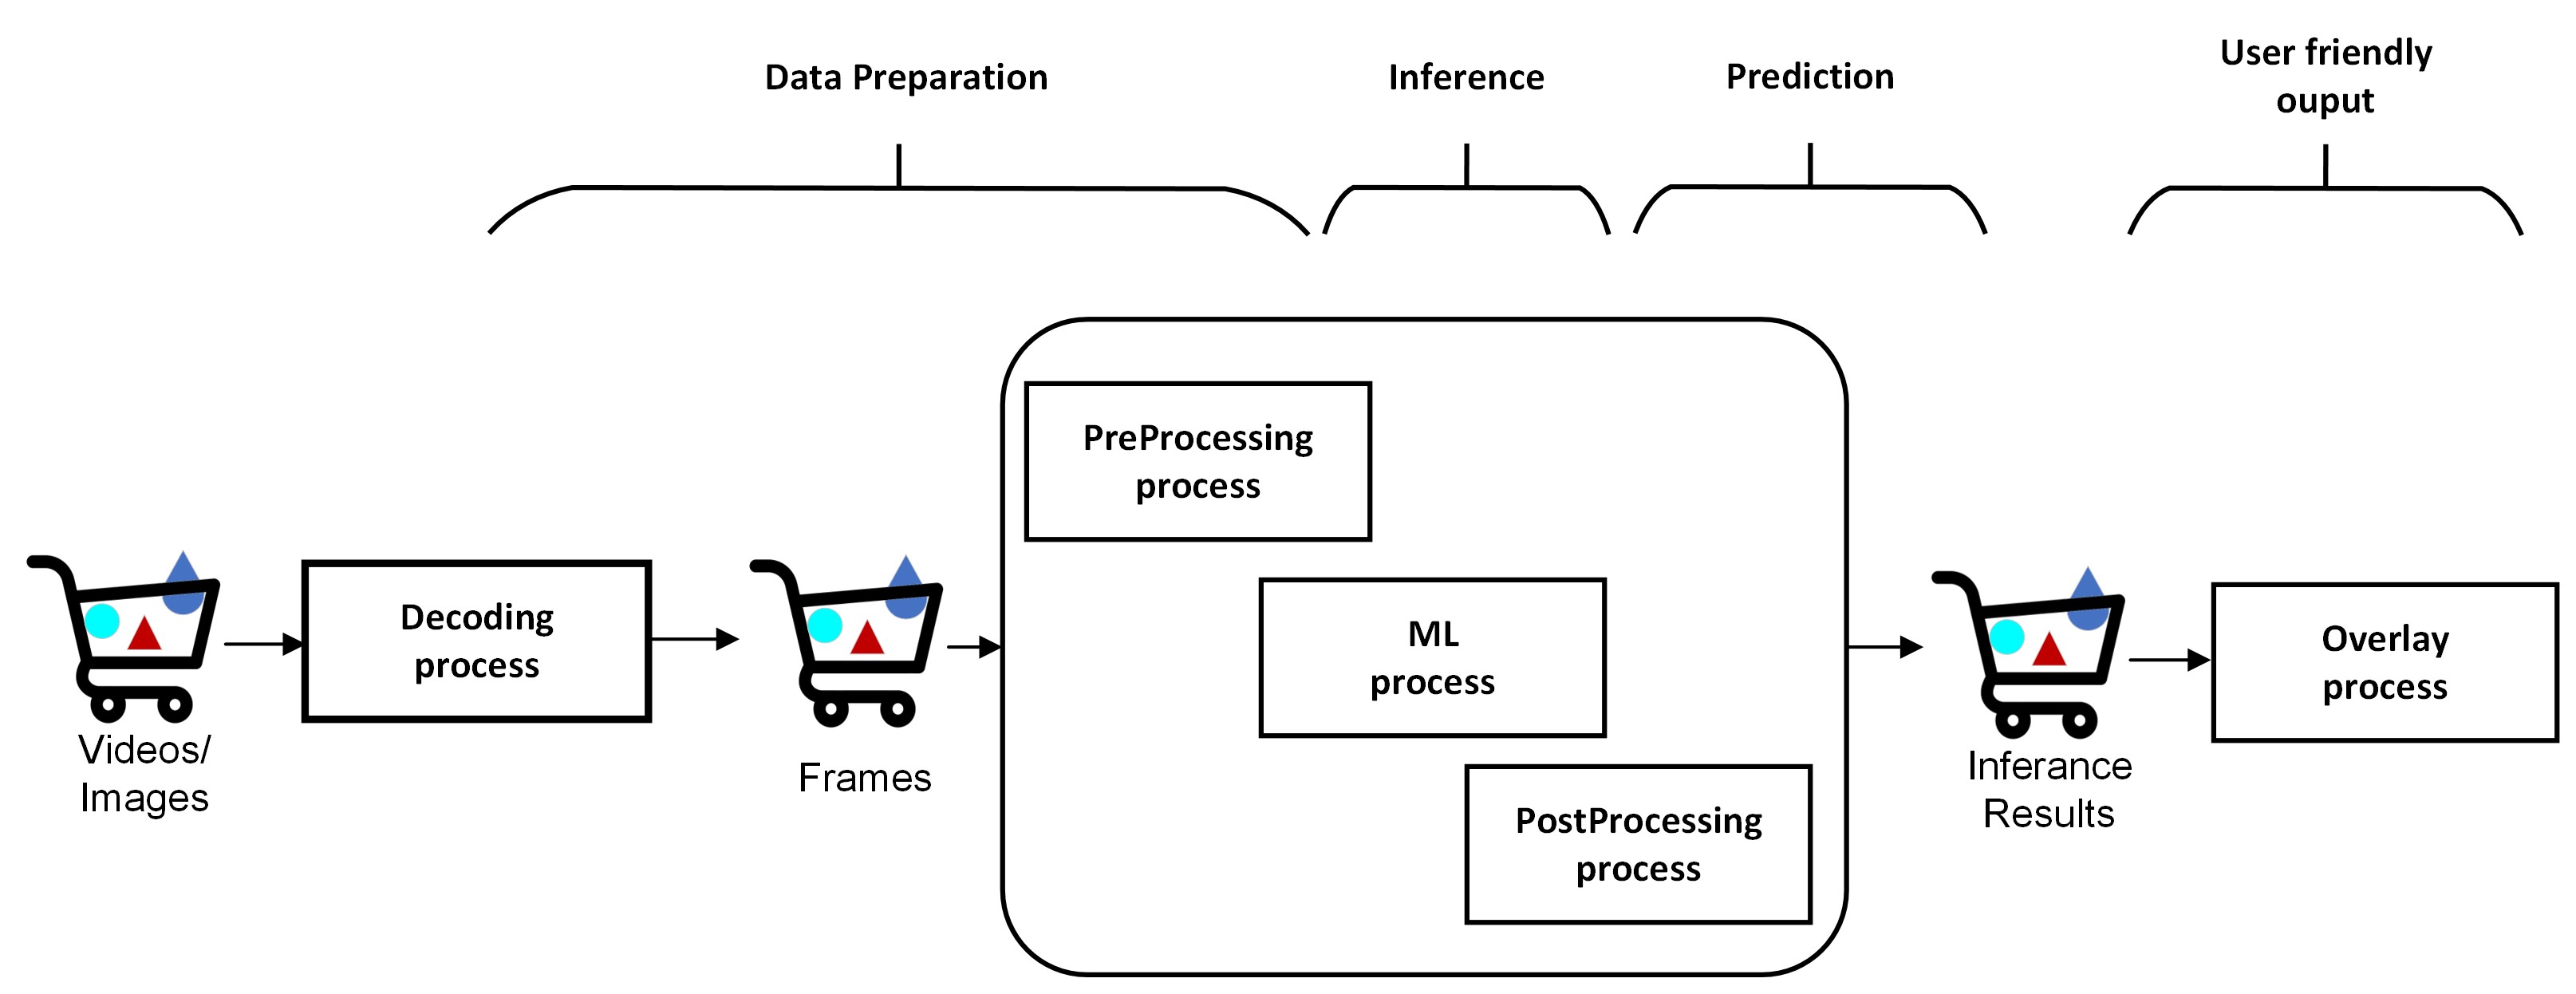
AMD provides VART APIs to realize highly optimized and complex Video Analytics solutions. This topic provides general guidelines for using VART APIs for video analytics application development. It refers to the x_plus_ml_app application, which implements an end-to-end video analytics pipeline using VART APIs. The application can be a good reference to understand the usage of VART APIs and develop different video analytics applications. Refer to the VART API documentation to learn more about VART APIs signature/parameters.
Application Overview#
This section covers the overview of the x_plus_ml_app. To make it easy to understand, it focuses only on the key steps. You can refer to the X + ML application source code (<path_to_Vitis-AI>/Vitis-AI/examples/x_plus_ml/) to correlate with the information mentioned in this document. This section starts with getting input as uncompressed (Raw data) frames. It is followed by preprocess, infer, post-process, and finally overlay the inference results on the frame.
The application’s main functionality includes:
Creation of various VART module instances and their configuration.
Main Loop - Read the input video data and preprocess frames - Perform inference on the preprocessed frames - Perform post-processing on output tensor from the infer module - Drawing predictions on the frames
Cleanup
Initialization#
The initial step involves creating contexts for various VART components, including device management, preprocessing, inference, and post-processing and overlay. Refer to the create_all_context() function of x_plus_ml_app for detailed implementation. This function is responsible for setting up the required resources and configurations of each component to function effectively within the application’s pipeline. A brief description of the initialization requirements of various VART components of an inference pipeline follow:
Device#
Device handle is a mandatory requirement for each VART module. All VART module APIs take Device handle (vart::Device) as one of the mandatory parameters. An application must create/obtain a device handle using the following API:
static std::shared_ptr<Device> vart::Device::get_device_hdl(const int32_t dev_idx, const std::string& xclbin_loc)
This function requires two parameters:
dev_idx: Specifies the index of the device on which the VART component needs to operate.xclbin_location: Indicates the location of the xclbin file. The xclbin file name is mandatory for modules utilizing hardware accelerators.
VideoFrame#
vart::VideoFrame is a fundamental component that holds the frame data and carries it through the pipeline from one module to the other within the VART framework. There are three different APIs to create vart::VideoFrame objects depending on the requirements. The following are the details of these APIs:
vart::VideoFrame(VideoFrameImplType type, size_t size, uint8_t mbank_idx, VideoInfo &vinfo, std::shared_ptr<Device> device);
This API creates a new vart::VideoFrame object and allocates memory to store the image/frame data. There are two types of VideoFrame implementations based on the type of the allocated memory. One implementation allocates physically contiguous memory using XRT (Xilinx Run Time), and the other allocates memory using malloc. It requires parameters such as the frame implementation type, size of the frame, memory bank index, video information (vinfo), and device handle created previously.
vart::VideoFrame(VideoFrameImplType type, uint8_t mbank_idx, std::vector<xrt::bo *>& bo_vec, VideoInfo& vinfo, std::shared_ptr<Device> device);
This API creates a new vart::VideoFrame object, but it does not allocate any memory for the image/frame data. It wraps the physically contiguous memory already allocated by the caller and passed as “bo” to this API. This pre-allocated memory is physically contiguous and allocated using the Xilinx Run Time (XRT) APIs. It accepts parameters including the frame implementation type, memory bank index, a vector of XRT buffer objects (bo_vec), video information (vinfo), and device handle.
vart::VideoFrame(VideoFrameImplType type, std::vector<uint8_t *>& data_vec, VideoInfo& vinfo, std::shared_ptr<Device> device);
This API creates a new vart::VideoFrame object, but it doesn’t allocate any memory for the image/frame data. It wraps the memory that is already allocated by the caller and passed as data_vec.
Note
this memory is not allocated using the XRT framework. This API requires parameters such as the frame implementation type, a vector of data pointers (data_vec), video information (vinfo), and a shared pointer to the device.
mbank_idx: Argument specifies the memory bank index on which memory needs to be allocated or has already been allocated in the case of user-provided XRT memory. For currently supported platforms, the memory bank index is 0.
vart::VideoInfo: Structure contains frame information, including padding and alignment. As preprocessing module may have specific alignment requirements, the application obtains vart::VideoInfo from the preprocessing module and creates a pool of frames for efficient memory utilization.
device: Handle to the device which this module will utilize.
Pre-Processing#
Preprocessing is an important module providing features like resize, color conversion, normalization, and quantization of input frame/image data to prepare it for ML operations.
The application creates PreProcess module instance using the following API:
vart::PreProcess(PreProcessImplType type, std::string& json_data, std::shared_ptr<Device> device)
The parameters for this API are as follows:
PreProcessImplType: There are two types of preprocessing implementations provided in this release. One is hardware-accelerated preprocessing, and the other is pure software preprocessing. This parameter specifies the type of VART-provided preprocessing module to be used. For example, vart::PreProcessImplType::IMAGE_PROCESSING_HLS is being used in the current application for hardware-accelerated image processing IP.
json_data: This parameter can be used to pass additional preprocessing-related configuration information. This information shall be in JSON format.
device: Handle to the device which this module will utilize.
Additionally, set_preprocess_info method allows setting the initial requirements of the vart::PreProcessor.
vart::PreProcess::set_preprocess_info(PreProcessInfo& preprocess_info)
The vart::PreProcessInfo structure includes parameters such as:
Parameter |
Description |
|
Quantization factor value |
|
Mean values for the red, green, and blue channels |
|
STD values for the red, green, and blue channels |
|
Output height |
|
Output width |
|
Color format of the required output |
|
PreProcess type to maintain aspect ratio |
|
Symmetric padding for letterbox preprocess type |
These are model-specific parameters, and using these parameters, the pre-process module prepares the image/frame for the infer module.
vart::VideoInfo carries the information like alignment adjusted width, height, and format information for an image/frame. The alignment requirements may be different for different implementations. User needs to provide the original width, height and format information and the alignment adjusted width and height information are provided by Pre-process module methods. vart::PreProcess module provides below mentioned methods for obtaining the required vart::VideoInfo.
vart::PreProcess::get_input_vinfo(int32_t height, int32_t width, VideoFormat fmt, VideoInfo& vinfo);

const VideoInfo& vart::PreProcess::get_output_vinfo();
The API vart::PreProcess::get_input_vinfo(int32_t height, int32_t width, VideoFormat fmt, VideoInfo& vinfo) fills the vart::VideoInfo structure based on the user provided Height, Width and VideoFormat. This structure is later used to create the input vart::VideoFrame for the preprocess module.
Similarly, the API vart::PreProcess::get_output_vinfo() returns the vart::VideoInfo that can be used to create the output vart::VideoFrame for the preprocess module.
The vart::VideoInfo is used to decide the memory requirement for the vart::VideoFrame.
Inference#
The inference module instance is created using the following API. Parameter model_directory refers to the path to the snapshot of the required model. More details about snapshots can be found in <WORKFLOW AND COMPONENTS> documentation.
vart::Runner* create_runner(const std::string& model_directory)
Additionally, vart::Runner provides APIs to obtain information about the model’s input and outputs. The usage of these APIs is demonstrated in the prepare_infer_configuration() function of the x_plus_ml_app. For further insights, refer to the application’s source code.
PLKernel#
The PLKernel module is designed to execute the tail graph in VART pipe but can also be used for any type of PL kernels after having the required implementation class. The interface uses variadic templates and std::any to accept arguments of any type. This approach provides high flexibility, allowing the passing of different types of arguments without the need to overload the method for each type combination. Such flexibility handles various data types dynamically, enhancing the code’s reusability for any xrt-based PL kernel.
An instance of the PLKernel module is created using the following API:
vart::PLKernelImplXrt(const std::string &kernel_name, const std::string &json_data, std::shared_ptr<Device> device);
This API accepts parameters including:
kernel_name: Specifies the kernel name required to open an xrt instance for that kernel.json_data: Provides kernel-specific additional configuration information in JSON format.device: Represents the handle to the device that the module will use.
After initializing the PLKernel instance, it is possible to set or get additional kernel-specific information necessary for processing using the following methods:
template <typename PLKernelAnyInfo> void set_config(PLKernelAnyInfo &info);
template <typename PLKernelAnyInfo> void get_config(PLKernelAnyInfo &info);
For a more comprehensive understanding of PLKernel usage, refer to Optimizing YOLOv5 Execution with NPU and PL on VEK280 Hardware
Post-processing#
Post-processing module performs a few additional operations on the output tensor data from the infer module and produces meaningful/user understandable inference results. Post-processing operation is model-specific, and this release provides post-processing modules for Resnet50, YOLOV2, and SSDResnet34. You may want to add new post-processing support or add new inference result data structures. For this, refer to “Adding custom implementation for VART::PostProcess and VART::InferResult”. The post-processing module instance can be created using the following API:
vart::PostProcess (PostProcessType postprocess_type, std::string& json_data, std::shared_ptr<Device> device);
This API accepts parameters including:
PostProcessType: Specifies the post-processing implementation class to invoke, allowing you to select the desired post-processing method.
json_data: Post-processing specific additional configuration information can be provided using this parameter. This information is in JSON format.
device: Handle to the device which this module will utilize.
Sample JSON string required by the vart::PostProcess module for ResNet50 and YoloV2 are as follows:
ReseNet 50
{
 "topk": 1,
 "label_file_path": "resnet50_labels.txt",
 "type": "RESNET50"
}
YoloV2
{
 "nms-threshold": 0.5,
 "label_file_path": "yolov2_labels.txt",
 "type": "YOLOV2"
}
After initializing the post-processing instance, additional model specific information necessary for post-processing is provided using the following method:
vart::PostProcess::set_config(std::vector<TensorInfo>& tensor_info);
The TensorInfo structure contains the following parameters:
Parameter |
Description |
|
The quantization factor to be used. |
|
The size of the tensor in bytes. |
|
The shape of the tensor. |
All these parameters are obtained from vart::Runner using the following code:
// create runner
auto runner = vart::Runner::create_runner(model_directory);
// get output tensors
auto output_tensors = runner->get_output_tensors();
for (size_t j = 0; j < output_tensors.size(); ++j) {
  auto size = output_tensors[j]->size;
  auto quantization_factor = output_tensors[j]->coeff;
  auto out_shape = output_tensors[j]->shape;
  /* use above values for each tensor*/
}
MetaConvert#
MetaConvert module parses the inference results obtained after post-processing and translates it into a structured that is understood by the overlay module. Overlay module understands the information related to things such as text, bounding box, arrows, and circle. This structured overlay data is subsequently utilized to annotate an input image with the inference results.
To create the meta-convert module instance, the application can use the vart::MetaConvert API:
vart::MetaConvert (InferResultType infer_res_type, std::string& json_data, std::shared_ptr<Device> device);
This API takes the following parameters:
InferResultType: Specifies the type of inference result (for example, classification or detection), to be parsed by this meta convert module.device: Handle to the device that this metaconvert module utilizes.json_data: From the inference results produced by the post-processing module, you can select the type of objects for which the information to be displayed, and specify things such as the font size. That configuration information can be provided to the meta convert module in JSON format using this parameter. In the reference sample application, this information is extracted from the application’s JSON settings provided by the user and passed to the meta convert module.
A sample JSON configuration for vart::MetaConvert is as follows:
{
    "display-level": -1,
    "font-size": 0.5,
    "font": 3,
    "thickness": 2,
    "radius": 5,
    "mask-level": 0,
    "y-offset": 0,
    "draw-above-bbox-flag": true,
    "label-filter": ["class"],
    "label-color": [
        {"level": 1, "red": 0, "green": 0, "blue": 255},
        {"level": 2, "red": 0, "green": 255, "blue": 0},
        {"level": 3, "red": 255, "green": 0, "blue": 0}
    ],
    "classes": [
        {
            "name": "bird",
            "blue": 255,
            "green": 0,
            "red": 0,
            "masking": 0
        }
    ]
}
You can add more elements in classes array to mask other classes to display. If you want all classes to display then you can remove or empty the classes array. More detailed usage of parameters are as follows:
Parameter |
Expected Values |
Description |
font |
0 to 7 |
Below is the list of text font values: - 0: Hershey Simplex (default) - 1: Hershey Plain - 2: Hershey Duplex - 3: Hershey Complex - 4: Hershey Triplex - 5: Hershey Complex Small - 6: Hershey Script Simplex - 7: Hershey Script Complex |
font-size |
0.5 to 1 |
Font fraction scale factor that is multiplied by the font-specific base size. Default value is 0.5. |
thickness |
Integer 1 to 3 |
The thickness of the line that makes up the rectangle. Negative values like -1 signify that the function draws a filled rectangle. Recommended value is between 1 and 3. Default line thickness value is 1. |
label-color |
Level 0 to N, blue 0 to 255, green 0 to 255, red 0 to 255 |
Allows assigning bounding box and label color to a particular level in the inference results tree. Colors are specified as an array with level, blue, green, and red parameters. If not parsed, default colors are used. Precedence order for color assignment is explained. |
label-filter |
[“class”, “probability”] |
Controls what should be displayed in the label string. Adding “class” adds the ML classification name, and adding “probability” adds the probability of positive object identification. |
y-offset |
Integer 0 to height |
‘y’ offset added along height for label in case of a classification model. |
classes |
JSON object |
Filtering option for Overlay. Bounding box is drawn only for listed classes. Class names and associated colors should match those assigned by the InferResult. |
display-level |
Integer 0 to N |
Display bounding box of one particular level or all levels. - -1 = display information at all the levels - 0 = do not display anything - N = specific level |
draw_above_bbox_flag |
True/False |
Label will be displayed on top of the bounding box if set to True. Default value is True. |
radius |
Integer |
Represents the radius of a circle, also used for a point. Default value is 3. |
Generating N-ary tree
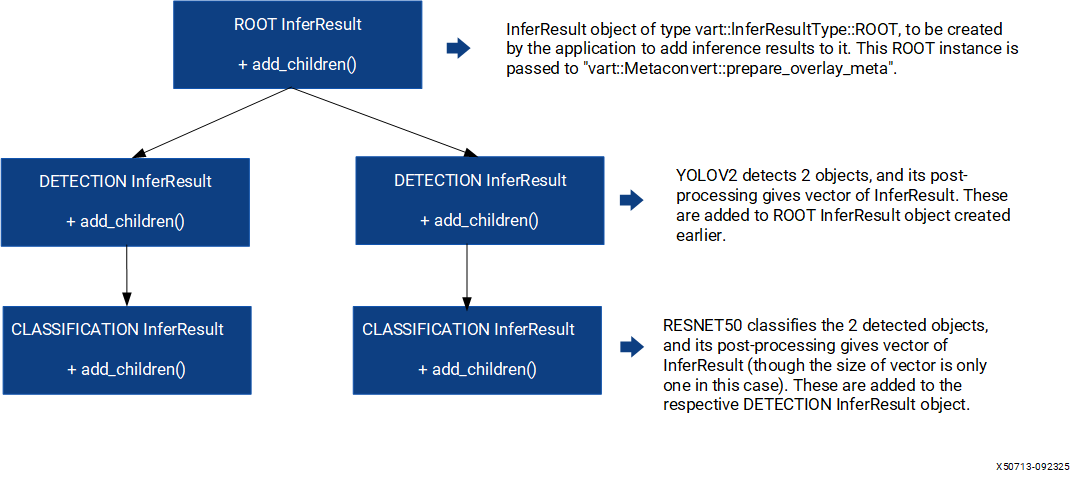
Metaconvert takes the root node of an N-ary tree of vart::InferResult objects as input and traverses through the tree to interpret results from all inference levels to populate the shape information to be overlayed on the input image. The tree structure input enables metaconvert to handle both single and cascaded inference cases.
In the case of single level inferencing, the root node will have only one level of children. vart::InferResult class provides interfaces to build the tree structure, the application has to use these interfaces to build the tree. Below snippet of code shows how to create the N-ary tree for single level inference case.
/* Create MetaConvert object, its constructor arguments are explained in following text */
meta_convert = new vart::MetaConvert(infer_result_type,
                                     metaconvert_config,
                                     device);
/* Run post-processing on inference output tensors for "batch_size" of frames */
vector<vector<shared_ptr<InferResult>>> inference_results = post_process->process(tensor, batch_size);
std::vector<std::shared_ptr<InferResult>> root_res;
for (uint32_t i = 0; i < batch_size; i++) {
  /* Create a dummy root node to build the tree */
  root_res.push_back(std::make_shared<InferResult>(InferResultType::ROOT));
  if (inference_results.size()) {
   /* Add inference results as children to the root node */
   (root_res.back())->add_children(inference_results[i]);
  }
  shared_ptr<OverlayShapeInfo> shape_info = meta_convert->prepare_overlay_meta(root_res.back());
}
In cascaded inferencing cases, the application can keep adding the results from each level to its previous level as children. Let us consider the below cascaded inferencing case to understand tree construction. The input image goes through a detection model like yolov2 and followed by resnet50 to classify each detected object. At the end, metaconvert and overlay will do the job of overlaying the inference results onto the input image.
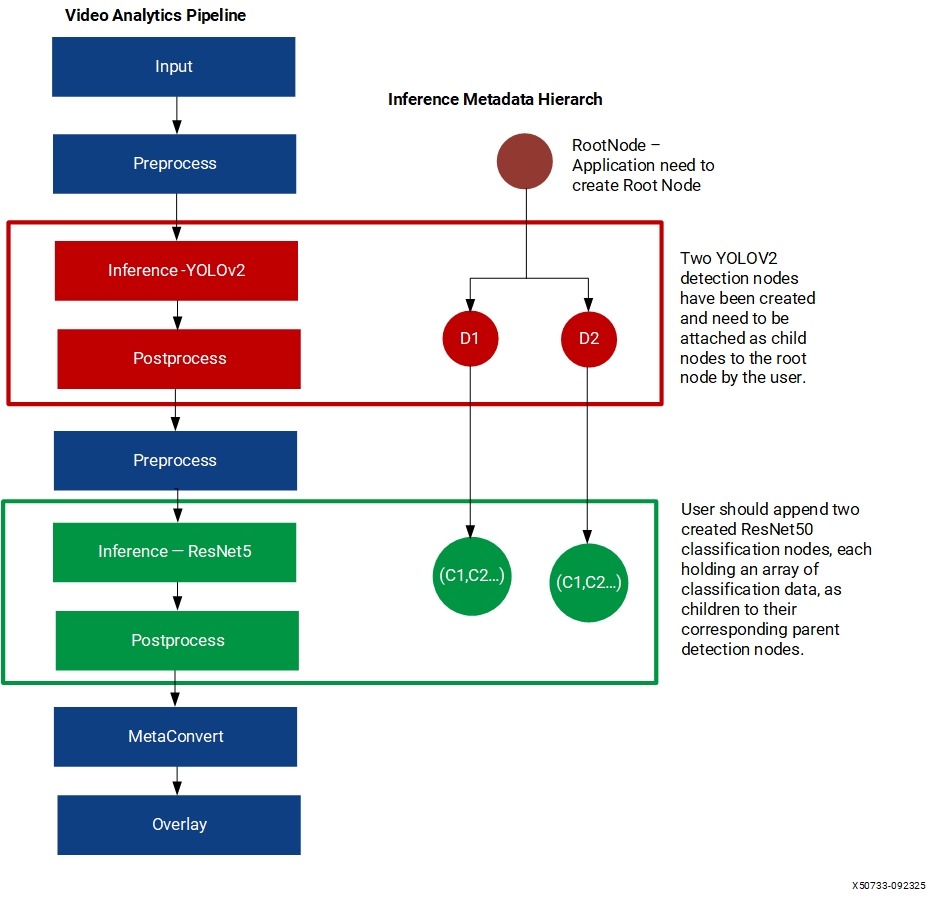
The following tree diagram depicts the course of the tree construction for the previous cascaded case.
Overlay#
The overlay module draws the results of inference onto the input frame using the information from overlay metadata structure generated by the meta-convert process. To create the overlay module instance, use the following API:
vart::Overlay (OverlayImplType overlay_impl_type, std::shared_ptr<Device> device);
This API takes the following parameters:
OverlayImplType: Specifies the implementation type to be instantiated for the overlay functionality. Currently VART supports only one implementation, based on OpenCV, for the Overlay functionality and is represented byvart::OverlayImplType::OPENCV.device: Handle to the device which this module will utilize.
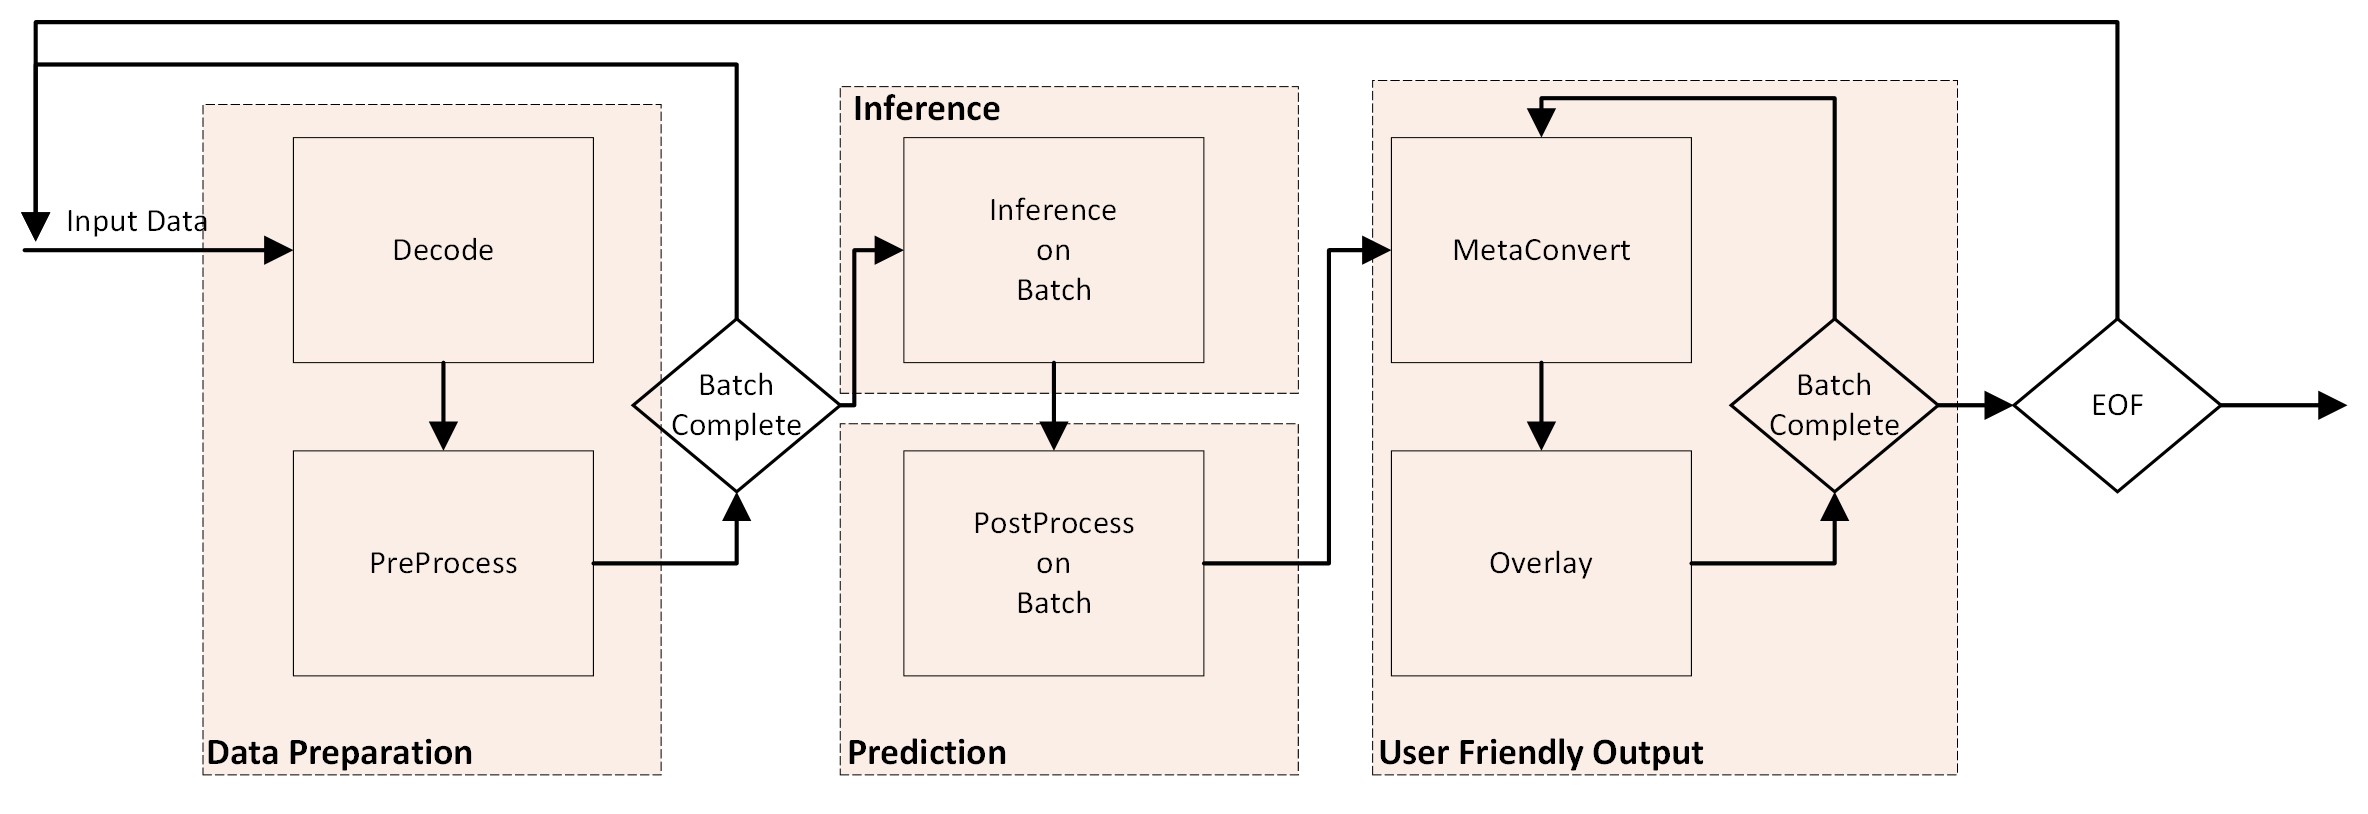
Main Processing#
This section covers details about how to use various VART APIs to perform the specific task, such as pre-processing, inference, and post-processing etc.,
The main loop is the central part of the X + ML application where the actual Inference processing takes place. It follows a series of steps in each iteration to handle frames from the input video.
Frame Acquisition#
The initial step in the main loop involves obtaining frames and populating them with data from the input video stream. The method of acquiring frames varies based on the specific implementation of the application. VART APIs expect frames with raw video data in formats like BGR or NV12. You can refer to the x_plus_ml_app application’s VideoFramePool, as well as the read_input() function, for insight into how to read data directly into frames from either raw input or an encoded input stream. Once the application has frames containing input video data in formats like BGR or NV12, these frames are forwarded to vart::PreProcess to generate input for inference.
Preprocessing#
Preprocessing involves applying necessary transformations or adjustments to frame data to prepare it for input to the neural network model, ensuring that it meets the model’s requirements.
vart::PreProcess provides the below-mentioned API to perform this operation:
vart::PreProcess::process(std::vector<PreProcessOp>& preprocess_ops);
where vart::PreProcess::PreProcessOp represents one pre-process operation to be performed. It has the following parameters:
Parameter |
Description |
|---|---|
RegionOfInterest in_roi |
Specifies the region of interest within the input frame. |
RegionOfInterest out_roi |
Specifies the corresponding region of interest within the output frame. |
VideoFrame in_frame* |
Pointer to the Input frame. |
VideoFrame out_frame* |
Pointer to the output frame. |
Each vart::PreProcessOp represents an operation to be performed on the input frame. It defines a region of interest within the input frame and in the output frame. The vart::PreProcess::process method can perform multiple vart::PreProcessOp operations.
Input frame passed to the preprocess module through PreProcessOps must be created by the VideoInfo obtained from vart::PreProcess::get_input_vinfo(int32_t height, int32_t width, VideoFormat fmt, VideoInfo& vinfo). Similarly, the output frame must be created by the VideoInfo obtained from vart::PreProcess::get_output_vinfo().
To understand the usage of the vart::PreProcess::process method, users can refer to the preprocess_process_frame() function in the x_plus_ml_app. This function demonstrates how to preprocess frames and prepare them for inference.
Once preprocessing is complete, the pre-processed frame is passed to the inference module for further machine learning operations.
vart::PreProcess::set_preprocess_info(PreProcessInfo& preprocess_info);
During pre-processing a frame, other than the information provided by vart::PreProcessOp, more information may be required, and that information shall be specified through the vart::PreProcessInfo structure using vart::PreProcess module during the initialization of the module. Please follow the Initialization section to get more details about vart::PreProcessInfo.
Running Inference#
This step entails feeding the preprocessed frames into the model and obtaining outputs from it.
vart::Runner is the class utilized for inference operations.
The inference module operates in batch mode, where input and output is an array of pointers to the buffers. For a model with N input layers and a snapshot with B as batch size, N*B pointers must be given. The input n of the batch b will be located at position [b*N + n]. In case an incomplete batch inference has to be executed, use NULL pointer for the unused batches. The non-null pointers must point to a buffer with enough memory: In case native format is enabled, the size is obtained from the native size of tensor structure, otherwise, the size is the one of the original model, from the tensor structure.
The following are the key methods provided by vart::Runner for inference processing:
int set_native_format(const npu_tensor_t* tensor, int format) |
Selects the data format of input and output tensors. The
|
std::pair<uint32_t, int> execute_async(const void** input, void** output) |
Asynchronously executes the inference process and generates the results.
The |
std::pair<uint32_t, int> execute_async(const uint64_t* input, uint64_t* output) |
Asynchronously executes the inference process and generates the results.
The |
int wait(int jobid, int timeout = -1) |
Waits until the execution completes. The optional |
The create_inference_context() and infer_process_frames() functions in the inference.cpp file
(located in the x_plus_ml directory) demonstrate how to use these inference methods in a practical example.
Running PLKernel#
The PLKernel executes the tail graph when it is enabled in JSON.
Kernel processing is handled with the following API:
template <typename... Args> void process(Args &&... args)
The application passes a vector of vart::Memory pointers holding input and output tensors data. The process method processes the input tensors and produces the output tensors for one inference cycle.
The following code snippet from x_plux_ml_app demonstrates the usage of the PLKernel process method:
bool plkernel_process_frames(
    AppContext *ctx, uint32_t current_batch,
    vector<vector<shared_ptr<vart::Memory>>> &npu_out_tensors_memory,
    vector<vector<shared_ptr<vart::Memory>>> &pl_out_tensors_memory) {
  LogLevel log_level = ctx->log_level;
  LOG_MESSAGE(LOG_LEVEL_DEBUG, log_level,
              "PL process called with current_batch = %d", current_batch);

  sync_tensors(ctx, npu_out_tensors_memory, pl_out_tensors_memory);

  if (ctx->plkernel_conf.plkernel_name == "yolov5_tail") {
    for (unsigned int b = 0; b < current_batch; ++b) {
      LOG_MESSAGE(LOG_LEVEL_DEBUG, log_level, "Processing batch %u", b);

      // Create the memory vector for the current batch, as the NPU output is
      // not a one-to-one map with PL input
      vector<shared_ptr<vart::Memory>> memory_vector;
      for (const auto &tensor_info : ctx->plkernel_conf.in_tensors) {
        // Use the global index to find the corresponding NPU output tensor
        int npu_mem_index = ctx->tensor_mapping[tensor_info.name];
        memory_vector.push_back(npu_out_tensors_memory[b][npu_mem_index]);
        LOG_MESSAGE(LOG_LEVEL_DEBUG, log_level,
                    "NPU tensor index %d mapped to PL input tensor '%s'",
                    npu_mem_index, tensor_info.name.c_str());
      }

      for (size_t i = 0; i < ctx->plkernel_conf.out_tensors.size(); ++i) {
        memory_vector.push_back(pl_out_tensors_memory[b][i]);
      }

      // Process tail for one inference
      ctx->plkernel->process(memory_vector);
      ctx->plkernel->wait(10);
    }
  }

  return true;
}
Post-processing#
After obtaining inference results, the application performs post-processing tasks on the model output data to generate understandable predicted outputs. Post-processing implementations vary depending on specific models and algorithms. You are responsible for understanding the algorithm and data alignment or placement in the inference output.
VART provides a framework where you can integrate your own post-processing implementations tailored to the requirements of your models. You must ensure that the output from post-processing conforms to the vart::InferResult format to maintain compatibility with subsequent modules in the VART pipeline. Follow the section Adding a custom post-processing implementation for more details about adding a custom post-process in VART.
void vart::PostProcess::set_config(std::vector<TensorInfo>& info, uint32_t batch_size);
std::vector<std::vector<std::shared_ptr<InferResult>>>
    vart::PostProcess::process(std::vector<int8_t*> data, uint32_t current_batch_size);
std::vector<std::vector<std::shared_ptr<InferResult>>>
    vart::PostProcess::process(std::vector<std::vector<std::shared_ptr<vart::Memory>>> tensor_memory,
                               uint32_t current_batch_size);
The vart::PostProcess::set_config() function provides the PostProcess module with essential tensor information and batch size. This information is crucial for parsing and processing the tensors. This method is invoked once, prior to any call to vart::PostProcess::process().
The vart::PostProcess::process() method executes post-processing on a batch of tensors generated by the inference module. It accepts a vector of tensor data, where each pointer in the vector corresponds to a specific tensor. The vector is organized to contain the tensors for one frame in sequence, followed by tensors for subsequent frames within the batch. To determine the number of output tensors produced by the model, you might use methods from vart::Runnermethods or refer to the vart::PostProcess::set_config method.
There are two versions of the vart::PostProcess::process() method. The first version accepts pointers of type int8_t, while the second version takes
std::vector<std::vector<std::shared_ptr<vart::Memory>>>. In this second version, the first dimension represents the batch size, and the second dimension indicates the number of tensors within each batch.
The second version of the process() method facilitates zero-copy operations. For more details, refer to the section titled Enabling Zero Copy using x_plus_ml_app.
For additional information, refer to the post_process.cpp file located in the x_plus_ml directory.
The process method generates a std::vector<std::vector<std::shared_ptr<InferResult>>>>, where the results vector contains outcomes for multiple frames. Each inner vector corresponds to the results for an individual frame within the batch. Each InferResult object comprises the processed output data, which is prepared for subsequent use.
InferResult#
The output of vart::Postprocess is a vector<vector<shared_ptr<InferResult>>>, where each element holds a vector of class vart::InferResult for each valid prediction in the batch of frames. Each vart::InferResult contains the processed output data ready for further utilization.
vart::InferResult provides an API to transform the inference results for the image resolution on which inference was performed to the results for an image of different resolution. Typically, in video pipelines, the input resolution differs from the resolution of the machine learning model. After preprocessing, the model operates on the preprocessed data and generates results based on the input resolution to the model. The transform method in vart::InferResult accomplishes this transformation.
vart::InferResult::transform(InferResScaleInfo& info);
where vart::InferResScaleInfo contains the width_scale_factor and height_scale_factor for the conversion.
Additionally, vart::InferResult provides the vart::InferResult::get_infer_result() method to obtain the actual user-understandable structure for each type of Inference. The output of get_infer_result() is typecast to the actual result data structure and used as per the requirement.
vart::InferResult supports two types of data structures: ClassificationResData and DetectionResData.
Category |
Method |
Description |
|---|---|---|
ClassificationResData |
|
Vector of label strings in classification result |
|
Vector of probability score in classification result |
|
|
Index of the class |
|
DetectionResData |
|
X coordinate of top left corner of the bounding box of detected object |
|
Y coordinate of top left corner of the bounding box |
|
|
Width of the bounding box |
|
|
Height of the bounding box |
|
|
Label strings of detected object |
|
|
Probability score of the infer result |
For usage of the results, please refer to postprocess_process_frames() or transform_infer_result() functions in x_plus_ml_app. Please follow the section Adding a custom Inference result type for more detail to add custom InferResult type in VART.
Visualizing Model Predictions#
In ML pipelines, it’s often useful to visualize the inference results produced by the model directly on the input frames. This involves tasks such as drawing bounding boxes around detected objects, labeling objects, or applying other visual enhancements based on the model’s predictions.
VART provides modules, vart::MetaConvert, for converting vart::InferResult to an overlay data structure and then vart::Overlay module overlays the detections onto vart::Frame.
To convert all InferResult data for each frame into overlay data structure, use the API mentioned below:
std::shared_ptr<OverlayShapeInfo> vart::MetaConvert::prepare_overlay_meta(std::vector<std::shared_ptr<InferResult>> infer_res);
This API prepares and returns a vart::OverlayShapeInfo structure that is easily understandable by the vart::Overlay module to draw on a frame. Once the overlay data is prepared, the below method is used to overlay the information onto the frame. The shape_info parameter contains the data generated by prepare_overlay_meta of the vart::MetaConvert class.
vart::Overlay::draw_overlay(VideoFrame& frame, OverlayShapeInfo& shape_info);
For more details about usage of vart::MetaConvert and vart::Overlay, please refer to the draw_infer_result() function in the x_plus_ml_app.
Finally, the user can choose to either dump the frame or send it for further processing as per their requirements. In the x_plus_ml_app, the output frame is dumped in raw format to a file and this can be referred in the dump_video_frame() function in the application.
In the application-specific cleanup phase, the program should release any memory it has allocated and reset all the resources it has utilized. This ensures that the application leaves no loose ends and is ready for future use.
As each user has their own requirements, the application provides a mechanism to change parameters for pre-process, post-process, and metaconvert via a JSON configuration file. The application expects the file to be in JSON format and to have sections for preprocess-config, postprocess-config, and metaconvert-config.
The application parses the preprocess-config, postprocess-config, and metaconvert-config sections and passes them to their respective modules without modifying them.
This approach allows users to customize and adapt the application to their specific requirements by modifying the configuration file, rather than altering the code directly. Each section of the configuration file has a specific role and purpose:
xclbin-location
Parameter |
Description |
|---|---|
xclbin-location |
This parameter holds the location of the xclbin file, which is necessary for defining the hardware configuration used by the application. The xclbin file contains the binary representation of the FPGA bitstream and is mandatory for the application to function correctly. |
preprocess-config
Parameter |
Description |
|---|---|
preprocess-config |
This section holds parameters for pre-processing the input data before it is fed into the model. Pre-processing ensures that the data is in the correct format and scale for the model to make accurate predictions. |
mean-r, mean-g, mean-b |
Mean values for red, green, and blue channels. These values are used to normalize the input image data by subtracting the mean. |
scale-r, scale-g, scale-b |
Scale values for red, green, and blue channels. These values are used to scale the pixel values to a range suitable for the model. |
colour-format |
Specifies the color format (e.g., “RGB”). This ensures that the color channels are correctly interpreted. |
maintain-aspect-ratio |
A boolean flag to maintain the aspect ratio of the image during resizing, which helps in preserving the geometric properties of the image. The field also requires a proper value for resizing-type. |
resizing-type |
Specifies the resizing method (e.g., “PANSCAN”), which dictates how the image should be resized to fit the model’s input requirements. This field is only used when “maintain-aspect-ratio” is set. |
in-mem-bank |
Memory bank index on which the application has to create memory for the input video frame. |
out-mem-bank |
Memory bank index on which the application has to create memory for the output video frame. |
postprocess-config
Parameter |
Description |
|---|---|
postprocess-config |
This section holds parameters required for post-processing the model’s output. Post-processing interprets the raw output from the model and converts it into meaningful information. For default and supported range of below parameters please consider the Postprocess section. |
topk |
Displays the top k confidence results, which helps in identifying the most probable predictions made by the model. |
label-file-path |
Path to the label file, which maps the model’s output indices to human-readable labels. |
type |
Specifies the type of post-processing model (e.g., “RESNET50”), which may have specific requirements for processing the output. |
metaconvert-config
Parameter |
Description |
|---|---|
metaconvert-config |
This section is used for metaconvert, which decides how the results are displayed on the output image. Metaconvert parameters control the visual representation of the model’s predictions. For default and supported range of below parameters please consider the MetaConvert section. |
display-level |
Specifies the level of display detail. |
font-size |
Defines the size of the font used for labels. |
font |
Specifies the font type. |
thickness |
Determines the thickness of the lines drawn on the image. |
radius |
Sets the radius for drawing circles or other shapes. |
mask-level |
Controls the masking applied to the output. |
y-offset |
Sets the vertical offset for drawing labels. |
draw-above-bbox-flag |
A boolean flag indicating whether to draw the labels above the bounding box. |
label-filter |
Filters the labels to be displayed based on specified criteria. |
label-color |
Defines the colors for labels at different levels, enhancing the visual distinction of different classes. |
classes |
A list of classes to be displayed or processed. |
By parsing and using these configurations, the application can be easily adapted to different use cases and requirements without modifying the underlying code. This modular approach increases the flexibility and usability of the application, making it more accessible to users with varying needs.
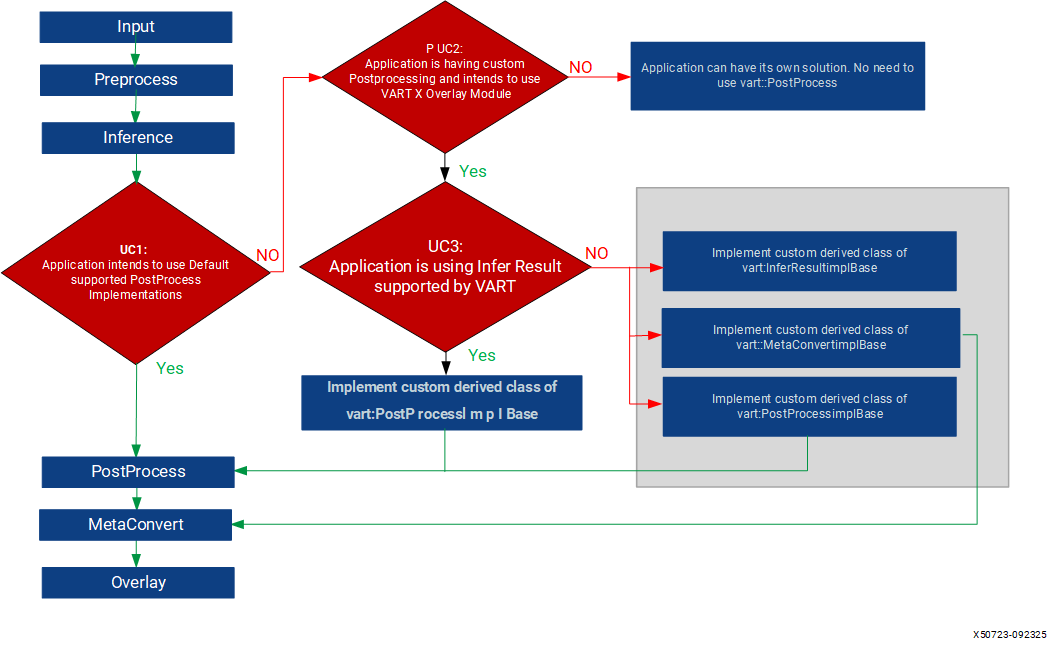
Postprocessing Use Cases#
The flowchart represents a typical application pipeline for video analytics, covering possible scenarios for VART Postprocessing.
S.No |
Application Type |
Description |
1 |
Application using Default Post Processing |
If the application runs models supported by vart::Postprocessing (Resnet50, YOLOV2, SSDResnet34), it can use default postprocessing. No custom implementation is needed. After obtaining inference results, the application uses VART Postprocess, Metaconvert, and Overlay modules. Example: Refer to the x_plux_ml_app example. |
2 |
Application does not use vart::Overlay |
If the application does not use the VART::Overlay module, it can skip VART Postprocess and Metaconvert modules. Custom solutions independent of the VART framework can be implemented. Reasons for not using vart::overlay: Requirement for a custom overlay pattern not supported by VART, existing implementation that needs to be utilized, or other factors leading to exclusion of the overlay module. |
3 |
Application using supported InferResult |
If using default supported vart::InferResultType, only custom post-processing is needed. No need for custom Metaconvert as the InferResult type is supported. Output of PostProcessing can be processed by the Metaconvert module. Refer: “Creating Custom Post Processing using supported InferResult” for more details. |
4 |
Application using custom InferResult |
If using custom InferResultType, implement custom InferResult, PostProcessing, and MetaConvert modules. Refer: “Creating Custom Post Processing using custom InferResult” for more details. Choose this use case when the default InferResultData does not meet application requirements. |
Configuration File of x_plus_ml_app#
Because you have unique requirements, the application provides a mechanism to change parameters for pre-process, post-process, metaconvert, and plkernel-config through a JSON configuration file. The application requires the file to be in JSON format and to contain sections for preprocess-config, postprocess-config, and metaconvert-config.
The application parses these three sections and passes them to their respective modules without modifying them. This design allows you to customize and adapt the application to your specific requirements by editing the configuration file rather than altering the code directly.
Following is an overview of the main configuration parameters:
xclbin-location |
This parameter holds the location of the xclbin file, which is necessary for defining the hardware configuration used by the application. The xclbin file contains the binary representation of the FPGA bitstream and is mandatory for the application to function correctly. |
|
use-native-output-format |
This field decides the NPU output tensor format, where the non-native format is the model’s actual tensor format or dimension, and the native format is specific to the NPU. 0 - Non-Native NPU format 1 - Native NPU format without zero copy 2 - Native NPU format with zero copy |
|
exec-cpu-subgraph |
When true, the CPU subgraph is executed on CPU; otherwise, it is not executed. When this is true, the output tensor format is FLOAT32. This mode is supported only when:
- |
|
preprocess-config |
This section holds parameters for pre-processing input data before feeding it into the model. Pre-processing ensures that the data is in the correct format and scale for the model to make accurate predictions.
|
|
postprocess-config |
This section holds parameters required for post-processing the model’s output. Post-processing interprets the raw output from the model and converts it into meaningful information. For the default and supported range of the following parameters, refer to the Postprocess section.
|
|
metaconvert-config |
This section is used for metaconvert, which decides how the results are displayed on the output image. Metaconvert parameters control the visual representation of the model’s predictions. For the default and supported range of the following parameters, refer to the MetaConvert section.
|
|
plkernel-config |
This section is for
|
By parsing and using these configurations, the application is easily adapted to different use cases and requirements without modifying the underlying code. This modular approach increases the flexibility and usability of the application. It is more accessible to you with varying needs.
Enabling Zero Copy Using x_plus_ml_app#
Zero copy is an essential feature in high-performance design. This technique enables direct data processing in the same buffer location. This eliminates the need for data copies between different locations, thereby improving efficiency and minimizing latency.
The vart::Runner provides settings to enable zero-copy mode through the following API:
int set_native_format(const npu_tensor_t* tensor, int format)
In this context, the tensor can represent an input or output tensor. The format parameter can take the following values:
0: Non-Native format (the model’s actual tensor format). You must provide virtual pointers that could be
int8,float32.1: Native format without zero copy. The native format is specific to the Runner, and you must supply virtual pointers.
2: Native format with zero copy. You should provide physical pointers.
Zero-copy functionality is achievable on both the input and output sides of the Runner only when the native format is used with the physical addresses of the buffers (that is, format = 2).
For input, the native format is either RGBA or RGBx. The native format for the output side is more complex. Consult the Runner’s documentation for more details.
Zero copy in x_plus_ml_app is configurable through the use-native-output-format field in the JSON file. It has the same values as vart::Runner::set_native_format().
In x_plus_ml_app, zero copy is used between the output of vart::PreProcess and the input of vart::Runner, as well as between the output of vart::Runner and the input of vart::PostProcess.
Refer to the following diagram for a clearer understanding of buffer allocation and data flow within x_plus_ml_app:
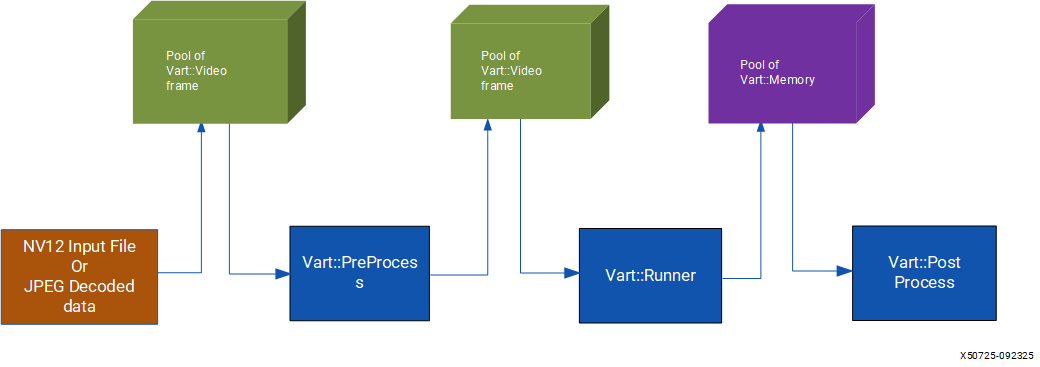
In x_plus_ml_app, the buffering process follows these steps:
An XRT-based input buffer pool of
vart::VideoFramestores input buffers. This pool receives data from NV12 input files or decoded JPEG files, which are copied into its buffers for processing byvart::PreProcess.A separate XRT-based buffer pool of
vart::VideoFrameholds the output fromvart::PreProcess. This buffer is configured to align with the dimensions and format required byvart::Runner. Thevart::PreProcesscomponent saves its output in this pool.The same buffers are then used as input for the
vart::Runner.Another XRT-based buffer pool of
vart::Memoryfor output tensors functions between thevart::Runnerand thevart::PostProcess. The Runner stores its output in this memory pool, which is passed to thevart::PostProcess.
To optimize available bandwidth across multiple DDRs, x_plus_ml_app allocates memory in different DDRs. The preprocess-config.out-mem-banks field determines which memory banks hold the output of vart::PreProcess or the input for vart::Runner. The postprocess-config.mem-banks field specifies which memory banks hold the output of vart::Runner or the input for vart::PostProcess.
When memory is allocated on only one DDR, the performance of vart::Runner (which operates in batch mode) is constrained by the available DDR bandwidth. To achieve optimal performance, allocate video and tensor memory across multiple DDRs. In addition, the vart::Runner, vart::PreProcess, and vart::PostProcess modules must have access to these DDRs.
For more information on zero copy, refer to the inference.cpp file located in the x_plus_ml directory.
Multi-instance Support of x_plus_ml_app#
Starting from VAI5.1, the x_plus_ml_app application supports both single and multiple snapshot executions. In earlier releases, only single snapshot execution was available.
Below is the design flow of x_plus_ml_app with multi-instance support.
Application Design#
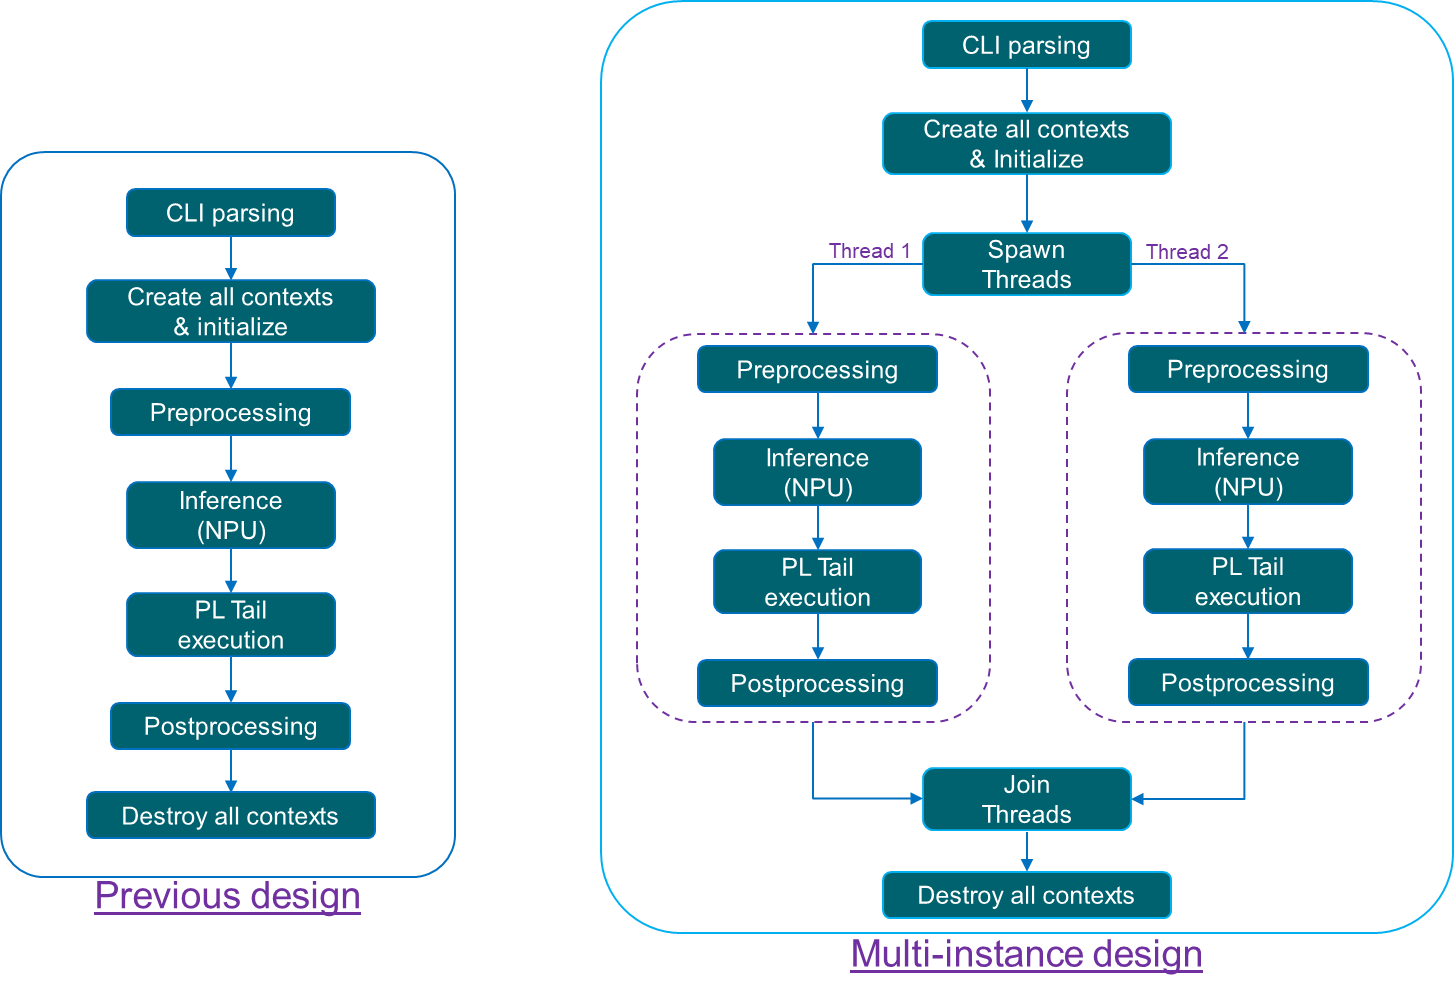
Multi-instance Execution Models#
Supports both Time-Multiplexing and Spatial Partitioning execution models.
Earlier releases: Only Time-Multiplexing was available.
From VAI5.1 onwards: Both models are supported.
Time-Multiplexing Execution#
Sample CLI:
x_plus_ml_app -i dog.jpg+dog.jpg -s snap.VE2802_NPU_IP_O00_A304_M3.resnet50+snap.VE2802_NPU_IP_O00_A304_M3.yolox -c resnet50.json+yolox_pl.json
Spatial Partitioning Execution#
Sample CLI:
x_plus_ml_app -i dog.jpg+dog.jpg -s snap.VE2802_NPU_IP_O00_A128_M3.resnet50+snap.VE2802_NPU_IP_O16_A080_M3.yolox -c resnet50.json+yolox_pl.json
Command Line Arguments#
To enable multi-instance support, while maintaining backward compatibility, the application’s CLI syntax has been slightly enhanced:
For each argument, you may now specify multiple values, separated by the ‘+’ delimiter depending on how snapshots you want to run.
For a single snapshot, supply one value per argument. This ensures backward compatibility with the existing CLI.
For two snapshots, supply two values per argument.
This allows you to run one or more snapshots in a single execution.
All arguments provided in the CLI must contain the same number of values. If the counts are mismatched, the application will raise a CLI parsing error.
Note
When mixing input types (e.g., -i img.jpg+vid.nv12), you must still provide matching number of resolutions with -d. For JPEG, supply a dummy resolution (e.g., 0x0) to maintain positional consistency, which application don’t care internally. Something like below sample CLI.
x_plus_ml_app -i img.jpg+vid.nv12 -d 0x0+1920x1080 -c 1.json+2.json -s snapshot1+snapshot2
For reference, the following section lists the CLI arguments along with sample commands for both single and multiple snapshot executions.
Usage: x_plus_ml_app [OPTIONS]#
-i: Input file path (mandatory)
-c: Config file path (mandatory)
-s: Snapshot path (mandatory)
-o: Output file path (optional) - If provided, inference results overlayed on the frame and dumped into this file.
-n: Number of frames to process (optional, default is to process all frames)
-l: Application log level to print logs (optional, default is ERROR and WARNING). - Accepted log levels: 1 for ERROR, 2 for WARNING, 3 for INFERENCE RESULT, 4 for INFO, 5 for DEBUG. - Logs at the provided level and all levels below will be printed.
-d: WidthxHeight of the input (mandatory for raw input files) - (required only in case of nv12 input, Ex : 224x224)
-r: Dump PL output, default is false
-h: Print this help and exit
Sample CLIs:#
Single snapshot:
x_plus_ml_app -i dog.jpg -c yolox_pl.json -s snapshot.yolox.0408 -l 3
Multi snapshots:
x_plus_ml_app -i dog.jpg+dog.jpg -c yolox_pl.json+yolox_pl.json -s snapshot.yolox.0408+snapshot.yolox.0408 -l 3+3
Implementing Custom Postprocessing#
Introduction#
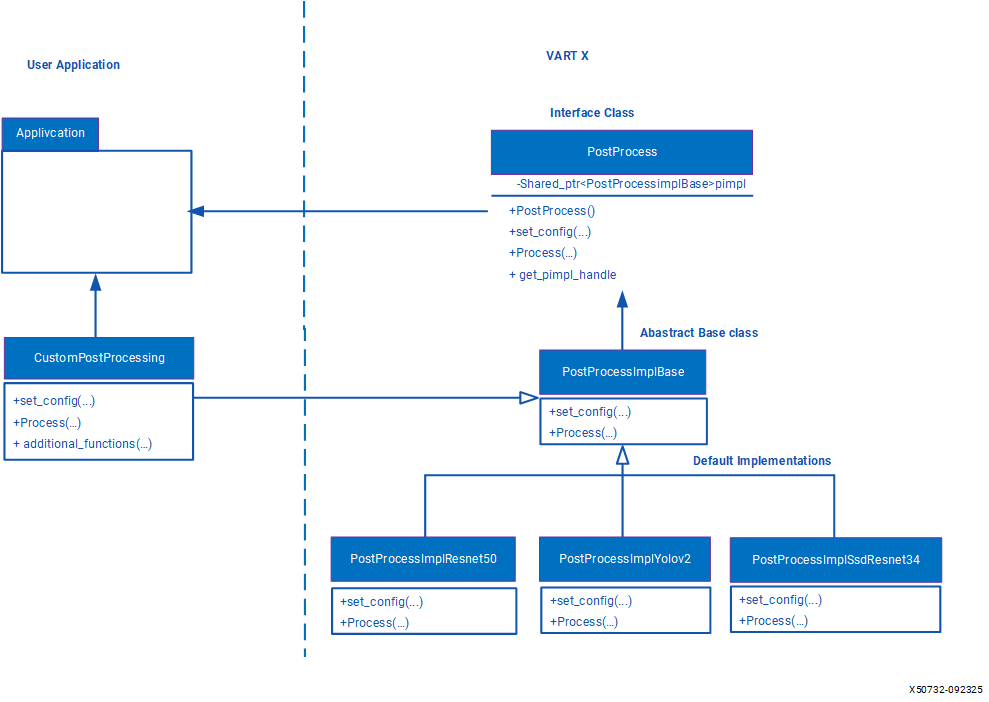
PostProcessing performs additional computations on output tensor data from NPU to generate more meaningful interpretation. Post processing by default supports YOLOv2, ResNet50, SSD-ResNet34. The design of the VART X modules, including the PostProcess module, follows the pimpl (pointer to implementation) design pattern. This pattern abstracts all the implementation details in a separate PIMPL class, while the application uses interfaces exposed by interface class. Post-process module consist of an interface class called PostProcess and an abstract base class PostProcessImplBase. To create a custom post-processing functionality, the user must create custom class which is derived from PostProcessImplBase class and override its methods with the desired custom functionalities. Now an instance of PostProcess class must be created by passing the object of the custom derived class of PostProcessImplBase. When application invokes any functionality with interface class PostProcess then the subroutines from the custom function’s will be invoked.
Creating Custom Post Processing using supported InferResult#
Please refer section “Class vart::PostProcess” for more information on the exposed vart::PostProcess class and its exposed methods.
Create a derived class of vart::PostProcessImplBase: - Create a custom class (e.g., PostProcessImplNewCustom) which is derived from vart::PostProcessImplBase. - In the custom class, users can override all virtual methods based on their specific implementation. - Custom class can accept parameters in its constructor for configuration. For example, user might want to pass certain scaling factors or thresholds that will influence how the post-processing is applied.
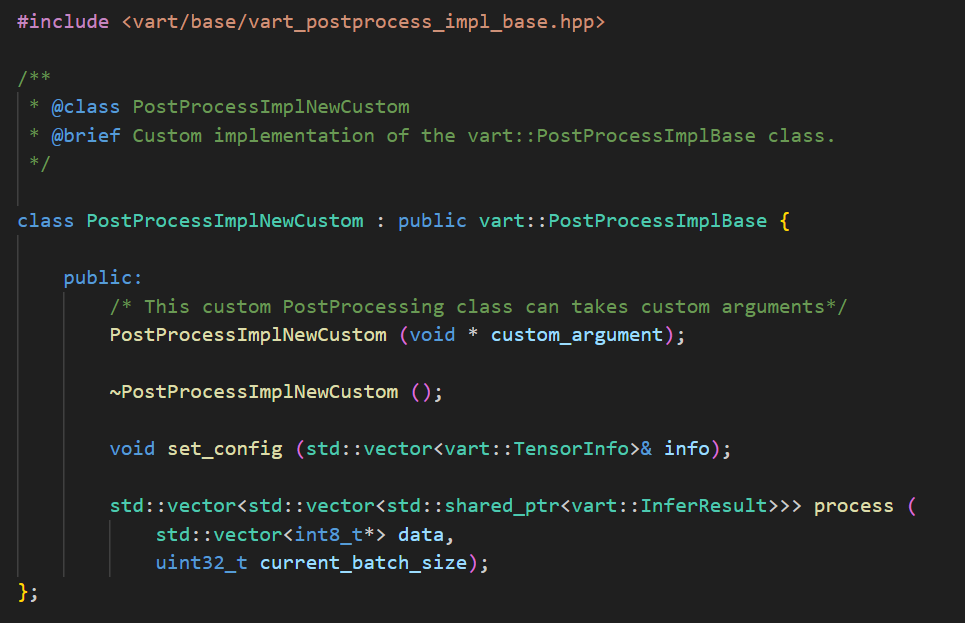
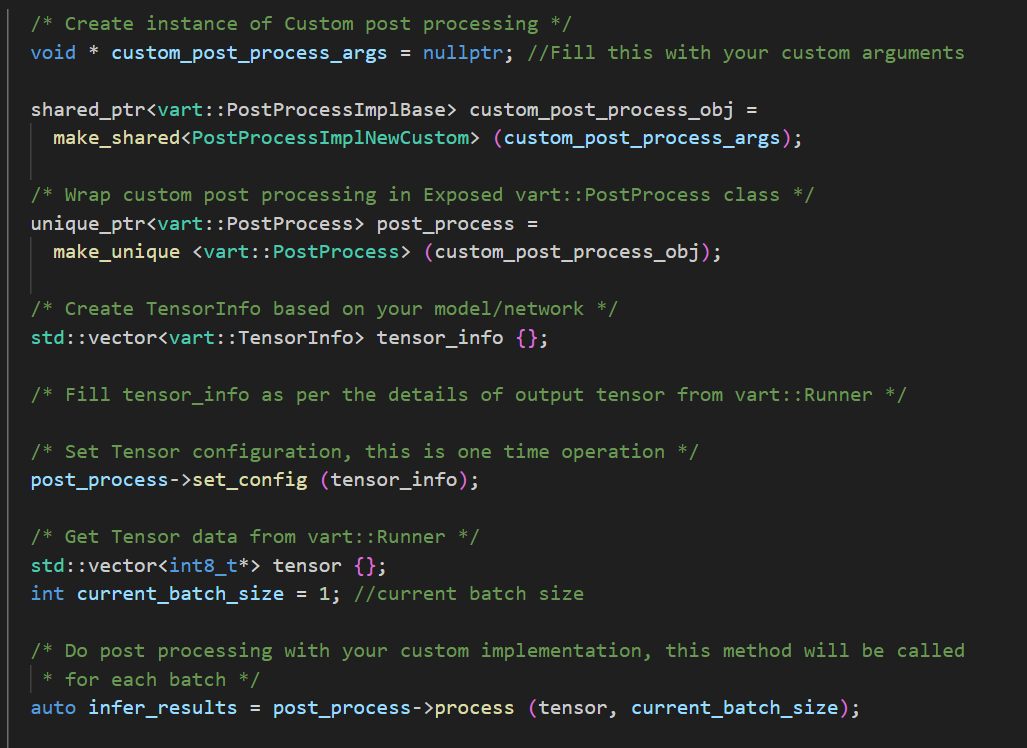
Integrating Custom Functionality into PostProcess Interface Class: - Create an instance of the PostProcessImplNewCustom, which contain all the custom functionalities. - Create an instance of the PostProcess class using the derived class instance (PostProcessImplNewCustom) which is created in previous step as shown below. - When the application invokes the member function using the handle of the PostProcess class then this will invoke the custom functionalities.
Creating Custom Post Processing using custom InferResult#
In this scenario we need to create custom InferResult, custom PostProcess and custom MetaConvert. Below diagram depicts class relations between application, user custom classes and vart modules. Classes highlighted in green color are the new custom implementation need to be written by user.
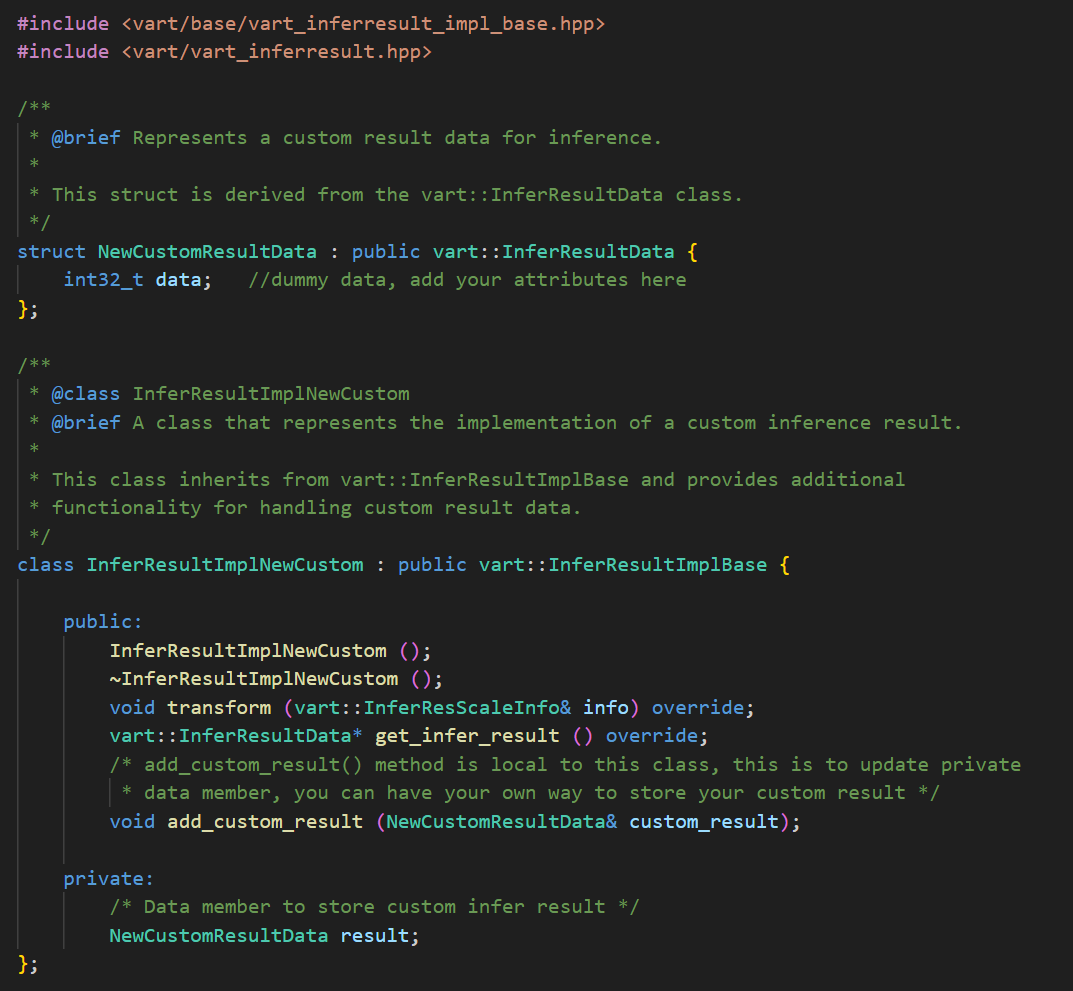
If the default Infer result structure InferResultData provided by VART does not meet application requirements, then users have the flexibility to create custom structure. In such cases, we need to write custom InferResult and utilize it within custom PostProcess implementation. Please refer section “Class vart::InferResult” for more information on the exposed vart::InferResult class and its exposed methods. Create a derived class (InferResultImplNewCustom) from the vart::InferResultImplBasebase class and override all the virtual methods. Create a structure based on application requirements to store the inference results (NewCustomResultData) which is derived from structure vart::InferResultData. vart::InferResultData has an enum member, vart::InferResultType, to specify the inference result type. There are few custom result types, you can use one of them. You can find custom InferResultType in file Vitis-AI/src/vart_x/include/vart_inferresult_types.hpp.
Custom Post Processing with custom InferResult#
Follow the steps mentioned in section “Creating Custom Post Processing using supported InferResult” for creating custom Post Processing. Follow the steps mentioned in section “Creating custom InferResult” for creating custom InferResult. To convert tensor data to a custom InferResult within a custom post-processing implementation, first instantiate an object of the derived class InferResultImplNewCustom. Then, use the handle of this object to create an instance of vart::InferResult by passing it to the constructor of vart::InferResult. Please find below code snippet.
custom-metaconvert
Creating Custom MetaConvert#
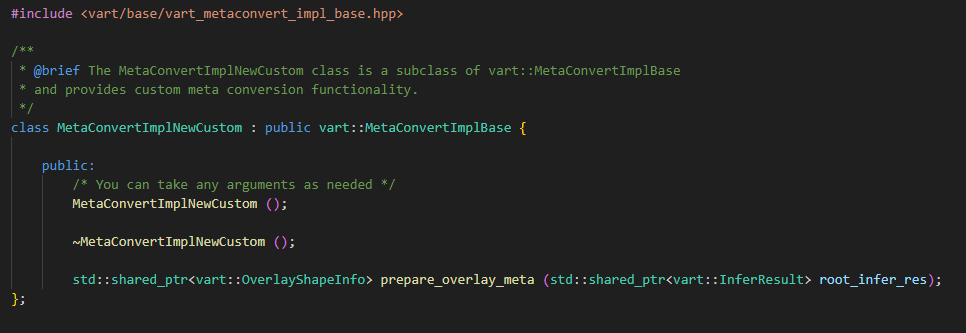
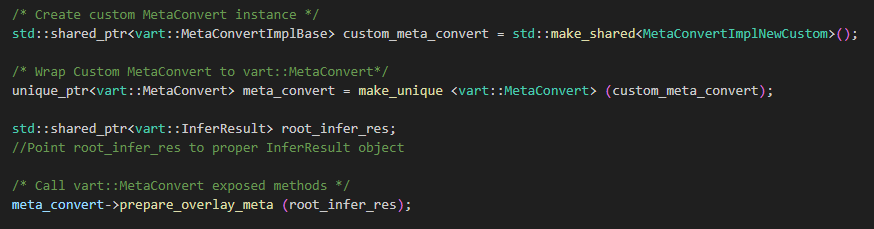
MetaConvert module used to convert the inference results into a format that can be further processed by VART Overlay module, which is often used for drawing bounding boxes or displaying classification labels on videos. To understand the exposed methods of vart::MetaConvert class please refer section “Class vart::MetaConvert”. vart::MetaConvert class is the interface class and vart::MetaConvertImplBase is the base abstract class. Similar to the other components, create a custom derived class (MetaConvertImplNewCustom) that inherits from vart::MetaConvertImplBase. In the custom derived class, define how the inference result will be converted into a format suitable for further processing.
To utilize this custom implementation, user need to create an instance of vart::MetaConvert by passing an object of the custom derived class to its constructor.
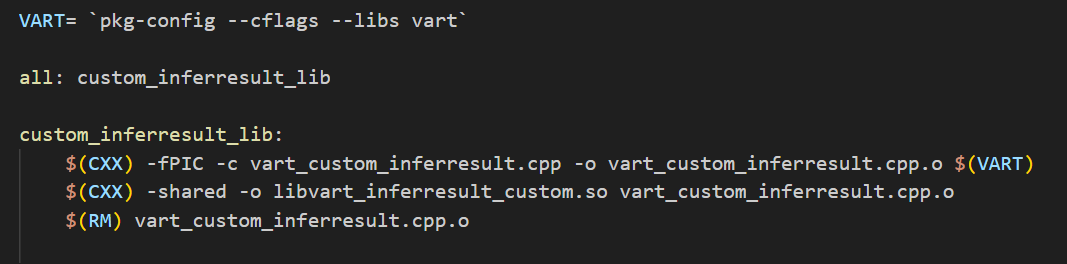
Compiling Custom InferResult Implementation as a Separate Library#
To compile this custom Post Processing implementation class, write a simple Makefile to compile this as a shared library and then you can link it with your application. This will compile custom postprocessing library to libvart_inferresult_custom.so, application can link with this library.
Compiling Custom PostProcess Implementation as a Separate Library#
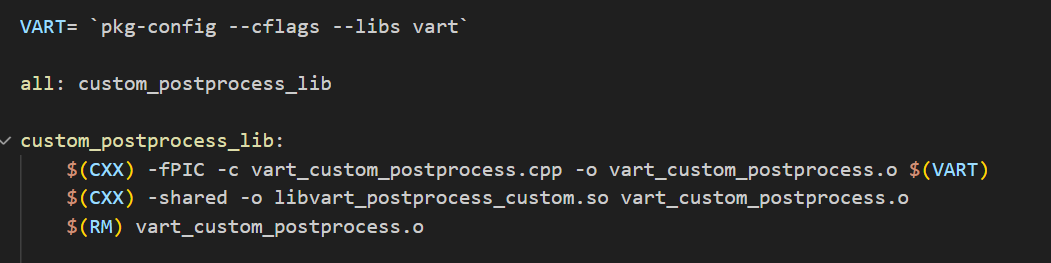
After your custom post-processing logic is defined, you can compile it as a shared library, so you don’t need to recompile the entire vart. To compile this custom Post Processing implementation class, write a simple Makefile to compile this as a shared library and then you can link it with your application. After building, you can link this shared library (libvart_postprocess_custom.so) with your application.
Compiling Custom MetaConvert Implementation as a Separate Library#
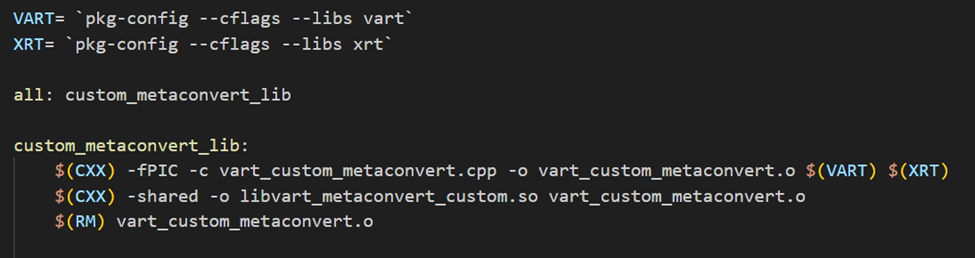
To compile this custom MetaConvert implementation class, write a simple Makefile to compile this as a shared library and then you can link it with your application. This will compile custom postprocessing library to libvart_postprocess_custom.so, application can link with this library. Vart::MetaConvert is dependent on XRT.
In conclusion, the utilization of VART APIs within video processing pipelines offers a seamless integration of machine learning components, enabling efficient decoding, preprocessing, inference, post-processing, and visualization of model predictions. By following the guidelines outlined in this document and referencing the provided x_plus_ml_app sample application, you can gain insights into effectively incorporating ML functionalities into their video analytics applications. The modular nature of VART facilitates customization and adaptation to diverse use cases, empowering developers to build sophisticated and robust video processing pipelines tailored to their specific requirements. With continued development and exploration of VART capabilities, the realm of video analytics stands poised for further advancements and innovations.