Run Your First Inference#
This guide walks you through running your first AI inference on the VEK385 board using pre-compiled models, so you can quickly verify the end-to-end stack and see NPU (Neural Processing Unit) acceleration in action.
Complete the following steps:
Boot the VEK385 board using the automated setup flow
Verify inference functionality with a pre-compiled ResNet50 INT8 model
Benchmark inference performance with the same model
Run image classification with ResNet50 INT8 from both C++ and Python
Run object detection with a pre-compiled YOLOX-M INT8 model
The focus here is on deployment and inference execution with ready-to-use models. For model quantization, compilation, and advanced configuration, refer to the later sections of the documentation.
Prerequisites#
Before starting, ensure you have:
VEK385 board with OSPI and SD card boot setup completed
Step 1: Login to the Board#
Boot up the board. Connect to the board via serial console or SSH:
# Via serial (from host machine)
minicom -D /dev/ttyUSB1 -b 115200

# Or via SSH (if network is configured)
ssh amd-edf@<board-ip-address>
Important
When sudo privileges are required, use the sudo -i command.
Default login credentials:
Username:
amd-edfPassword:
<User Password>
After login, verify the environment is ready:
# Check environment variables
echo $LD_LIBRARY_PATH

# Verify kernel module
lsmod | grep amdxdna
Expected output:
/usr/lib/python3.12/site-packages/flexmlrt/lib/:/usr/lib/python3.12/site-packages/voe/lib/:/usr/lib/python3.12/site-packages/onnxruntime/capi
amdxdna               200704  0
xilinx_aie            299008  3 amdxdna,zocl
Root (sudo) privileges are required for all inference operations in the following steps (ml_vart, x_plus_ml_vart, and the Python ONNX Runtime script). The NPU device can only be accessed by the root user. Before running any inference command in Steps 2–5, elevate to the root user:
sudo -i
Step 2: Verify VART Application#
The VART (AMD Vitis™ AI Runtime) application is pre-installed and ready to use. Run a verification test with a pre-compiled ResNet50 INT8 model to confirm the inference pipeline is working correctly.
Run Inference Verification#
Execute the following command to run inference with the pre-compiled model:
ml_vart --app-config /etc/vai/ml_vart/json_configs/ml_vart_config.json
This command runs inference using the ResNet50 INT8 model. The configuration file specifies the model path, input data, and reference output for validation.
Expected Output#
You should see output similar to:
Wrote tensor 0 data for frames 0-0 to file: "output/infer_out0-int8_1x1000_output.bin"
Run completed successfully.
The message “Run completed successfully” indicates that the inference executed properly on the NPU.
This program outputs the raw ResNet50 1000-class prediction as a .bin file (the model’s raw output tensor), which is different from the human-readable classification labels produced in Step 4.
Verify Output Correctness#
Compare the inference output with the reference to verify accuracy:
diff output/infer_out0-int8_1x1000_output.bin /etc/vai/models/resnet50_int8/data/ofm_output_int8_1x1000.bin
If the inference is correct, diff produces no output, indicating the inference result matches the reference exactly.
Note
The ml_vart tool runs a predefined test with known inputs and expected outputs. This verification confirms that the hardware acceleration pipeline (model → NPU → output) is functioning correctly.
Run Benchmark Test#
To measure the inference performance, run the benchmark test with multiple iterations:
ml_vart --app-config /etc/vai/ml_vart/json_configs/ml_vart_config.json --benchmark --runs 1000
Expected output:
Average inference time over 1000 runs: 2.67 ms
Run completed successfully.
This benchmark runs 1000 inference iterations and reports the average inference time.
Step 3: Inference with Python ONNX Runtime#
In addition to the C++ ml_vart application, you can also run inference from Python using ONNX Runtime with the Vitis AI Execution Provider (Vitis AI EP). A reference script run_ResNet50_vitisai.py is pre-installed under /etc/vai/python/ on the board.
Run Inference#
Run the script with the default ResNet50 INT8 model and input:
cd /etc/vai/python
python3 run_ResNet50_vitisai.py
Equivalent explicit invocation showing all defaults:
cd /etc/vai/python

python3 run_ResNet50_vitisai.py \
  --model resnet50_int8 \
  --base-dir /etc/vai/models \
  --onnx-name resnet50_int8.onnx \
  --config-name vitisai_config.json \
  --input /etc/vai/models/resnet50_int8/data/ifm_input_fp32_1x3x224x224.bin
Key command-line options:
--model: Model folder name andcache_key(default:resnet50_int8)--base-dir: Root directory containing per-model subfolders (default:/etc/vai/models)--onnx-name: ONNX filename inside the model directory (default:resnet50_int8.onnx)--config-name: Vitis AI EP config filename inside the model directory (default:vitisai_config.json)--input: Raw float32 NCHW IFM.binfile (default:/etc/vai/models/resnet50_int8/data/ifm_input_fp32_1x3x224x224.bin)--input-name: Which ONNX input to feed (default: first input from the model)--output-prefix: Output prefix for OFM files (default:./<model>_ofm)--postprocess: Apply softmax on the first output and print top-k class IDs--postprocess-top-k: Number of top classes to print (default:5)--labels: Optional ImageNet-style labels file (1000 lines), used with--postprocess
Script Overview#
run_ResNet50_vitisai.py performs the following steps:
Creates an
onnxruntime.InferenceSessionconfigured withVitisAIExecutionProvider, pointing to the model’svitisai_config.jsonand a cache directory/key so the compiled artifacts can be reused.Reads a raw float32 NCHW
.binfile as the input feature map (IFM) and reshapes it to match the model’s first input tensor.Runs
sess.run()to execute inference on the NPU.Writes each output tensor as a float32
.binfile using the prefix<output-prefix>_<i>.bin(default:./<model>_ofm_<i>.bin).Optionally (with
--postprocess) applies softmax on the first output and prints the top-k class IDs (with optional ImageNet labels).
Default model layout (under --base-dir, default /etc/vai/models):
/etc/vai/models/
`-- resnet50_int8/
    |-- resnet50_int8.onnx
    |-- vitisai_config.json
    `-- data/
        `-- ifm_input_fp32_1x3x224x224.bin
Expected Output#
model: /etc/vai/models/resnet50_int8/resnet50_int8.onnx
config: /etc/vai/models/resnet50_int8/vitisai_config.json
cache_dir: /etc/vai/models/ cache_key: resnet50_int8
input file: /etc/vai/models/resnet50_int8/data/ifm_input_fp32_1x3x224x224.bin
input tensors:
  input tensor(float) [1, 3, 224, 224]
output tensors:
  output tensor(float) [1, 1000]
feeding input dtype= <class 'numpy.float32'> shape= (1, 3, 224, 224) from /etc/vai/models/resnet50_int8/data/ifm_input_fp32_1x3x224x224.bin
wrote OFM 0 output (1, 1000) -> ./resnet50_int8_ofm_0.bin
Step 4: Image Classification Examples#
This step demonstrates end-to-end image classification using the pre-compiled ResNet50 INT8 model. Two equivalent flows are provided:
C++ flow using the
x_plus_ml_vartapplication (VART runtime with built-in pre/post-processing)Python flow using
run_ResNet50_vitisai.py(ONNX Runtime with Vitis AI EP)
Both flows take a JPEG image as input, run inference on the NPU, and report the top-5 predicted ImageNet classes.
Option A: C++ Image Classification with VART#
The x_plus_ml_vart application provides an end-to-end classification pipeline (image decode, preprocessing, NPU inference, and softmax post-processing) driven by a JSON configuration file.
Run image classification on the sample image:
x_plus_ml_vart \
  --app-config /etc/vai/x_plus_ml_vart/json_configs/x_plus_ml_vart_1model.json \
  --input-file /etc/vai/models/resnet50_int8/data/classification.jpg \
  --log-level 3
Expected output:
[RESULT] x_plus_ml_vart.cpp:1004  Model 0: /etc/vai/models/resnet50_int8/resnet50_int8.rai
[RESULT] postprocess.cpp:1190  Model 0 - Post Process : Classification (SOFTMAX)
[RESULT] postprocess.cpp:592  Model 0 - Frame 0:
[RESULT] postprocess.cpp:603    Classification Label : brain coral (confidence 0.989553)
[RESULT] postprocess.cpp:603    Classification Label : coral reef (confidence 0.006668)
[RESULT] postprocess.cpp:603    Classification Label : electric ray, crampfish, numbfish, torpedo (confidence 0.001488)
[RESULT] postprocess.cpp:603    Classification Label : puffer, pufferfish, blowfish, globefish (confidence 0.000547)
[RESULT] postprocess.cpp:603    Classification Label : eel (confidence 0.000426)

Total number of frames processed: 1
---------------------------------------------------------------------------------------
Model [/etc/vai/models/resnet50_int8/resnet50_int8.rai] with device batch size 1 processed 1 frames
---------------------------------------------------------------------------------------
The top-1 prediction is brain coral with 0.99 confidence, matching the content of the input image.
Option B: Python Image Classification with Vitis AI EP#
Re-run the Python script from Step 3 with post-processing enabled to print the top-k ImageNet classes:
cd /etc/vai/python
python3 run_ResNet50_vitisai.py \
  --postprocess \
  --postprocess-top-k 5 \
  --labels /etc/vai/models/resnet50_int8/data/imagenet-classes-1000.txt
Expected output:
model: /etc/vai/models/resnet50_int8/resnet50_int8.onnx
config: /etc/vai/models/resnet50_int8/vitisai_config.json
cache_dir: /etc/vai/models/ cache_key: resnet50_int8
input file: /etc/vai/models/resnet50_int8/data/ifm_input_fp32_1x3x224x224.bin
input tensors:
  input tensor(float) [1, 3, 224, 224]
output tensors:
  output tensor(float) [1, 1000]
feeding input dtype= <class 'numpy.float32'> shape= (1, 3, 224, 224) from /etc/vai/models/resnet50_int8/data/ifm_input_fp32_1x3x224x224.bin
wrote OFM 0 output (1, 1000) -> ./resnet50_int8_ofm_0.bin
postprocess: top 5 (class_id, prob):
  109 0.9902213598591998 brain coral
  973 0.006672059040093626 coral reef
  5 0.001159430010331261 electric ray, crampfish, numbfish, torpedo
  397 0.0005476759571246568 puffer, pufferfish, blowfish, globefish
  390 0.00033218225958356605 eel
Both flows produce consistent top-1 results (brain coral), demonstrating that the same compiled model can be deployed via either the C++ VART runtime or Python ONNX Runtime with Vitis AI EP.
Step 5: Object Detection Example#
In addition to image classification, the x_plus_ml_vart application also supports object detection. This example uses a pre-compiled YOLOX-M INT8 model (640x640 input) to detect objects in a sample image and draw bounding boxes with class labels and confidence scores.
The flow is identical to the classification example: a JSON configuration file selects the detection model, and Non-Maximum Suppression (NMS) post-processing.
Run Object Detection#
Run object detection on the sample image:
x_plus_ml_vart \
  --app-config /etc/vai/x_plus_ml_vart/json_configs/x_plus_ml_vart_od.json \
  --input-file /etc/vai/models/yolox_m_int8/data/detections.jpg \
  --log-level 3
Expected output:
[RESULT] x_plus_ml_vart.cpp:1004  Model 0: /etc/vai/models/yolox_m_int8/yolox_m_int8.rai
[RESULT] postprocess.cpp:1202  Model 0 - Post Process : Detection (NMS)
[RESULT] postprocess.cpp:592  Model 0 - Frame 0:
[RESULT] postprocess.cpp:613    Detection bbox  x : 17 y : 168 width  : 130 height : 92 and label : tvmonitor (confidence 0.908203)
[RESULT] postprocess.cpp:613    Detection bbox  x : 289 y : 219 width  : 66 height : 93 and label : chair (confidence 0.843750)
[RESULT] postprocess.cpp:613    Detection bbox  x : 358 y : 223 width  : 63 height : 92 and label : chair (confidence 0.843750)
[RESULT] postprocess.cpp:613    Detection bbox  x : 479 y : 350 width  : 161 height : 74 and label : diningtable (confidence 0.765625)
[RESULT] postprocess.cpp:613    Detection bbox  x : 166 y : 234 width  : 19 height : 31 and label : vase (confidence 0.764648)
[RESULT] postprocess.cpp:613    Detection bbox  x : 448 y : 120 width  : 13 height : 23 and label : clock (confidence 0.710938)
[RESULT] postprocess.cpp:613    Detection bbox  x : 406 y : 222 width  : 40 height : 81 and label : chair (confidence 0.609375)
[RESULT] postprocess.cpp:613    Detection bbox  x : 557 y : 211 width  : 79 height : 79 and label : tvmonitor (confidence 0.606445)
[RESULT] postprocess.cpp:613    Detection bbox  x : 240 y : 198 width  : 13 height : 16 and label : vase (confidence 0.583984)
[RESULT] postprocess.cpp:613    Detection bbox  x : 547 y : 301 width  : 43 height : 101 and label : vase (confidence 0.580078)
[RESULT] postprocess.cpp:613    Detection bbox  x : 444 y : 166 width  : 75 height : 126 and label : refrigerator (confidence 0.562500)

Total number of frames processed: 1
---------------------------------------------------------------------------------------
Model [/etc/vai/models/yolox_m_int8/yolox_m_int8.rai] with device batch size 1 processed 1 frames
---------------------------------------------------------------------------------------
Each detection entry reports the bounding box coordinates (x, y, width, height) in pixels, the predicted class label, and a confidence score. The post-processor also produces an overlay image with the bounding boxes drawn on the original input. The generated output files (including the overlay image) are written to the output directory under the current working directory.
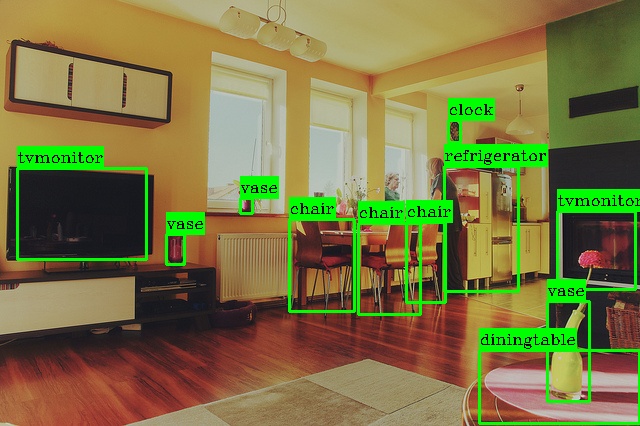
The overlay shows the detected objects (TV monitors, chairs, dining table, vases, clocks, and refrigerator) annotated with their class labels and confidence values, providing visual confirmation of the NPU inference results.
Summary#
You have successfully completed the Vitis AI Quick Start Guide. You have:
Booted the VEK385 board with automated OSPI and SD card setup
Verified the VART application and benchmarked inference performance with a pre-compiled ResNet50 INT8 model
Run Python-based inference using ONNX Runtime with the Vitis AI Execution Provider
Performed image classification with the ResNet50 INT8 model using both the C++
x_plus_ml_vartapplication and the Python ONNX Runtime flowPerformed object detection with the pre-compiled YOLOX-M INT8 model and visualized the bounding-box overlay output
Next Steps#
Now that you are familiar with running inference on the VEK385 board, explore the following topics:
Model Quantization: Learn how to quantize your own ONNX models with lower precision bits
Model Compilation: Learn how to compile your own ONNX models for the NPU using the Vitis AI compiler
Model Execution: Learn how to deploy your compiled ONNX models on HW