Build the Reference Design#
This section explains how to build the reference design from source code on your host machine.
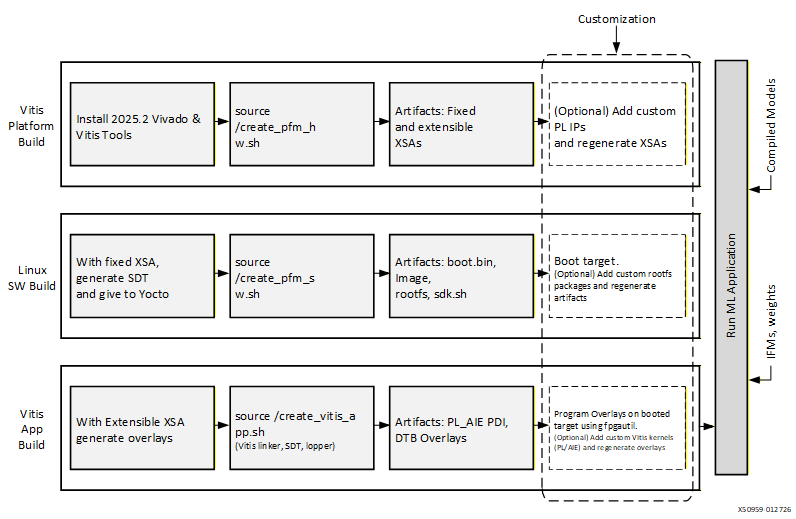
Reference Design Build flow#
Prerequisites#
Before starting, ensure you have:
Refer to Obtaining License for instructions to obtain the
AIE-MLv2 CompilerandVivado ML Enterprise Editionlicenses.The XILINXD_LICENSE_FILE environment variable set to your license file path
Setup Environment#
Setup Vitis Environment#
Navigate to the platform directory:
// RevA platform
cd <sources_path>/versal_2ve/reference_design/vek385/rev-a

// RevB platform
cd <sources_path>/versal_2ve/reference_design/vek385/rev-b
Set license file (if not already configured):
# run this only if XILINXD_LICENSE_FILE is not set
export XILINXD_LICENSE_FILE=<path_to AIE / Vivado license_file>
Download and apply the following tool patches that fixes the intermittent Vivado tool crash and Inference application failures:
https://adaptivesupport.amd.com/s/article/000040013?language=en_US
https://adaptivesupport.amd.com/s/article/000039757?language=en_US
# Set XILINX_PATH to point to the patches location
export XILINX_PATH=<path to patches>/AR000039757_Vivado_2025_2_preliminary_rev1/vivado:<path to patches>/AR000040013_vitis_2025_2_preliminary_rev1/vitis
Source Vitis tools:
source <vitis_install_dir>/2025.2/Vitis/settings64.sh
Building Vitis Platform#
Follow these steps to generate the extensible Vitis platform (XSA) for Vitis application integration and the fixed XSA for software artifacts generation.
Tool Setup
Install: AMD Vitis and Vivado tools version 2025.2. Refer to Vivado 2025.2 Installation requirements.
Run the following script to create Hardware Platform:
source ./create_pfm_hw.sh
This script performs the following:
Creates the Vivado design.
Runs synthesis and implementation.
Generates hardware artifacts in the hw folder.
Generated Artifacts
Fixed XSA:
Contains boot.pdi.
Used by Yocto to generate:
BOOT.bin
Other software artifacts such as linux kernel image and root filesystem
Extensible XSA:
Includes platform ports.
Used by Vitis tools to add custom kernels.
Note
To open the Vivado project .xpr file targeted to the VEK385 rev-b board, use the following steps:
Open Vivado GUI
Source the following settings from tcl console
set_param noc.enableSeparateMEProgramming false
set_param noc.remap.costOptimizerAlgorithm false
Continue opening the Vivado project (.xpr)
The Vivado project is built with these settings included in design sources to support enabling all 9 AIE NSUs. Not sourcing these settings before opening the Vivado project produces errors and prevents you from continuing with customization.
Building Software Components Using Yocto#
This section outlines the process of generating software artifacts using the Yocto build system, based on the Fixed XSA generated during the Vitis platform creation.
Environment Setup
Install Yocto prerequisites
The Reference Design Source Compilation uses Yocto sources and depends on specific applications. Refer to the requirements documentation for detailed dependencies in system-requirements
Ubuntu 22.04.4 LTS – A Linux-based operating system for use as a server/host.
We need to install the following mandatory dependent packages which are required for Yocto build:
sudo apt install curl build-essential chrpath cpio debianutils diffstat file gawk gcc git iputils-ping libacl1 liblz4-tool locales python3 python3-git python3-jinja2 python3-pexpect python3-pip python3-subunit socat texinfo unzip wget xz-utils zstd graphviz
Set locale for Yocto
export LC_ALL=en_US.UTF-8
export LANG=en_US.UTF-8
Update user git configuration information with sample commands as below.
git config --global user.email "user@example.com"
git config --global user.name "User Name"
Note
Replace “user@example.com” and “User Name” with user details
Run Yocto Build Script
Execute:
source ./create_pfm_sw.sh
This script takes the hardware file hw/example_design_pfm_fixed.xsa as input.
Generated Artifacts
System Device Tree (SDT)
BOOT.bin
Image
Root Filesystem
sdk.sh
These are created by calling:
sw/yocto/create_yocto.sh
All artifacts are copied to: artifact/amd/boot_images
These files provide all that is needed to perform the initial boot of the target device. Users can now create and run applications on the A78 ARM processor. However, these files do not include any programmed programmable logic (PL) or AI Engine (AIE) overlay files. Programming of the PL and AIE occurs later when you apply the generated overlay created by the Vitis application, as described in the next steps.
Adding User Packages to Rootfs
To customize the root filesystem:
Modify the script: sw/yocto/create_yocto.sh
Add the required user packages.
Clean the Yocto workspace, in sw/yocto:
source create_yocto.sh -c
Rerun the build:
source ./create_pfm_sw.sh
Preparing the UFS Boot Image for Rev-B
Perform the following steps on the host system to prepare the UFS boot image for Rev-B.
Refer to INSTALL_SYSROOT to install the sysroot and set up the environment.
Run the following script to create the UFS boot image:
source ./create_ufs_image.sh
Vitis Application Development#
This section describes the process of building programmable logic (PL) and AI Engine (AIE) kernels using Vitis tools. The build generates the PDI and overlay files. These files are used to configure and program the PL and AIE on a target device that has already been booted. This multi-stage boot process is enabled through Segmented Configuration.
Segmented configuration allows the processors in a Versal device to boot and access DDR memory before the programmable logic (PL) is configured. This approach lets DDR-based software such as Linux start first, with the PL configured afterward as needed from a boot device or DDR image, enhancing boot flexibility and efficiency. For more information, see the Segmented Configuration Documentation
Steps:
Navigate to the “<sources_path>/versal_2ve/reference_design/vek385/<rev-a/rev-b>” directory.
Run the script:
source ./create_vitis_app.sh
This invokes:
Vitis linker
Generated application artifacts:
PL AIE PDI
DTB Overlays
The generated artifacts are copied to: vaiml_platform/artifact/overlay